Warning
Be sure to read and understand the safety instructions related to the Robotiq Force Torque Sensor prior to installation.
Standard delivery for an FT Sensor kit:
|
FTS-300-KIT-001 |
|---|
|
Robotiq Force Torque Sensor FT 300 unit |
|
1 m pigtail cable (CBL-COM-2068-01) |
|
10 m Robotiq Device Cable (CBL-COM-2065-10-HF) |
|
USB Signal Converter (ACC-ADT-USB-RS485) |
Info
Coupling is mandatory for the FT 300.
Info
The following are not included in delivery unless specified in the purchase:
Please refer to the Spare Parts, Kits and Accessories section for a list of available parts.
The FT 300 Force Torque Sensor is designed for industrial applications. Always respect the following specified storage, transport and operating environmental conditions:
|
CONDITION |
VALUE |
|---|---|
|
Minimum storage/transit temperature |
-25°C |
|
Maximum storage/transit temperature |
70°C |
|
Minimum operating temperature |
15°C |
|
Maximum operating temperature |
35°C |
|
Humidity (non-condensing) |
20-80% RH |
|
Vibration (storage / transit) |
5G |
|
Vibration (operating) |
2G |
|
Other |
|
You must use a coupling to attach the Sensor to a robot. Be sure to use the coupling related to your robot model. Our couplings are listed according to ISO 9409-1 and this covers most bolt patterns. If there is no coupling for your robot, you can modify a blank coupling or Robotiq can create a custom version for you. Some couplings may require an additional adapter plate. To create your own coupling or adapter plate you can refer to the Technical Dimensions section. To see available couplings and adapter plates and for details, refer to the Spare Parts, Kits and Accessories section.
Info
The FT 300 coupling is mandatory, you can customize yours from a blank provided by Robotiq.
Here are the steps to follow for the installation of the Sensor (see figure below). Note that all screws must be locked in place using medium strength threadlocker, such as Loctite 248 or a similar product.
Fig. 3.1: Attaching the FT 300 sensor to a robot arm using the mandatory coupling.
The Sensor needs to be supplied by a DC voltage source. This power supply is not included with the Sensor.
|
POWER SUPPLY SPECIFICATIONS |
VALUE |
|---|---|
|
Output voltage |
5 to 24 V DC |
|
Max power consumption |
2 W |
|
Overcurrent |
1 A Fuse (Phoenix #0916604 (UT6-TMC M 1A)) |
|
Overvoltage protection |
Warning Maximum output voltage tolerance is 10%, exceeding this limit, 26.4 V DC could damage the Sensor. |
Info
Robotiq recommends the use of the following power supply:
TDK-Lambda DPP Series, 15W Single Output DIN Rail Mount Power Supply, DPP15-24
Power and communications are established with the FT 300 Force Torque Sensor via a single device cable. The FT 300 has a pigtail cable.
The figure below represents the FT 300 Force Torque Sensor receptacle (Sensor side) and connector (cable side) with associated pinout. The M12 - 5 pin A-coded connector is used in accordance with IEC 61076-2-101.
Warning
Use proper cabling management. Be sure to have enough forgiveness in the cabling to allow movement of the Gripper along all axes without pulling out the connectors. Always protect the controller side of the cable connection with a strain relief cable clamp.
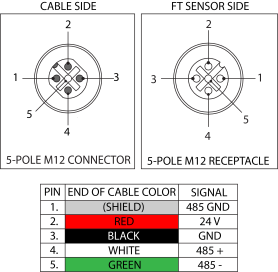
Fig. 3.2: Pinout of the Robotiq Force Torque Sensor FT 300 and color code for the respective cable type.
Info
Power pins 2 & 3 are connected to the specified power supply.
Info
RS-485 signal pins 1, 4 & 5 are connected directly, to a RS-485 / USB converter or to a RS-485 / RS-232 converter.
When using a RS485 to USB converter (refer to the Spare Parts, Kits and Accessories section), the wiring must respect the figure below and subsequent directions. GND / 0V is wired to Sensor pin #1 as stated in the Wiring section.
The converter will provide you with a standard USB 2.0 male A connector.

Fig. 3.3: Wiring diagram for the RS485 to USB converter
Warning
Power is not delivered via the USB, do not plug 24V into the USB.
When using a RS232 to RS485 converter (refer to the Spare Parts, Kits and Accessories section), the wiring must respect the figure below.
Warning
Do not wire converter pin #3 (5V) on the RS485.
The 24V power supply is NOT supplied via the converter.
The converted side will provide you with a standard DB - 9 female connector with signaling as shown in the figure below.
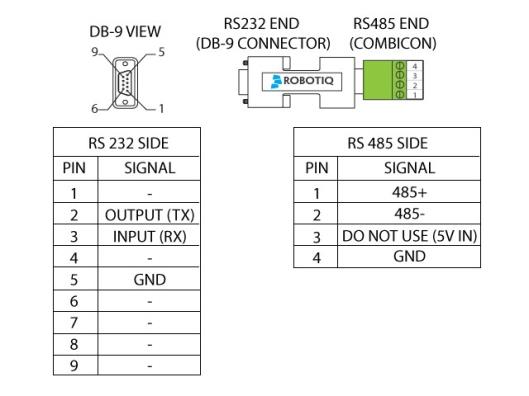
Fig. 3.4: Wiring diagram for RS232 to RS485 converter.
The table below shows which Robotiq software to use with your version of Universal Robots’ controller. If you are using a CB3 or CB3.1 controller, it is recommended to use the Force Copilot URCaps Package.
|
Robotiq Software |
Universal Robots' controller version |
|||
|---|---|---|---|---|
|
CB1 |
CB2 |
CB3 |
CB3.1 |
|
|
Legacy Driver Package (DFU-1.1.15) (includes Gripper toolbar) |
Incompatible |
Compatible |
Compatible |
Compatible |
|
ActiveDrive Toolbar (ADU-1.0.1)
|
Incompatible |
Compatible |
Compatible |
Compatible |
|
FT 300 Force Torque Sensor URCap Package up to 1.1.1 (includes ActiveDrive toolbar) |
Incompatible |
Incompatible |
Compatible |
Compatible |
|
Force Copilot URCap Package (includes ActiveDrive toolbar) |
Incompatible |
Incompatible |
Incompatible |
Compatible |
Refer to the appropriate section depending on your controller version:
Info
The robot's PolyScope version must be 3.5 and higher in order to install and use the URCap.
Prior to any software installation, connect the white, green and bare wires to the Robotiq RS-485 signal converter (ACC-ADT-RS485-USB) as shown in the figure below. Also connect the red (24V) and black (0V) wires in the controller according to the figure below.
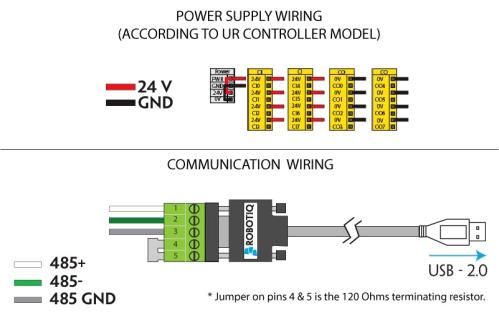
Fig. 3.5: Force Torque Sensor wiring to Universal Robots’ controller.
Info
Prior to use over Universal Robots, adjust the payload and the center of gravity from the Installation tab (refer to the Moment of Inertia and Center of Mass section).
Info
The robot's PolyScope version must be 3.5 and higher in order to install and use the URCap.
Follow this procedure to install the Force Copilot URCap Package.
|
|
Caution Make sure that the license dongle stays connected to the robot. |
|
|
|
Tip
Go to the PolyScope home page and tap the About button. A window containing the Universal Robots software version will pop up.
|
|
|
|
|
|
|
|
|
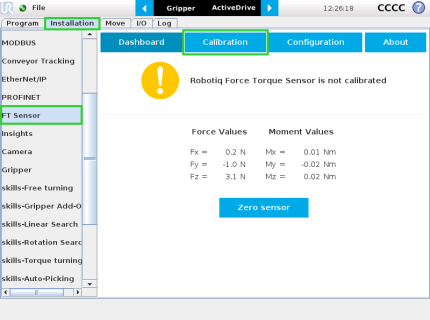
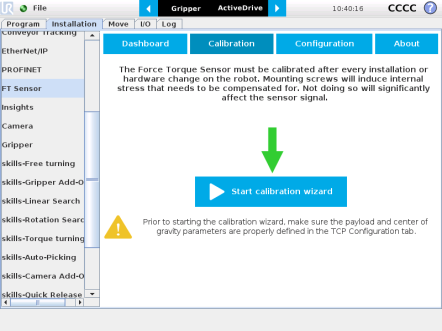
If the Force Torque Sensor is mounted on the robot for the first time, the calibration must be performed. Refer to the Calibration Procedure with Universal Robots section for the calibration procedure.
Warning
The sensor must be recalibrated after each uninstall / install on the robot. Mounting screws will induce internal stress that needs to be compensated for. Not doing so will significantly affect the sensor signal.
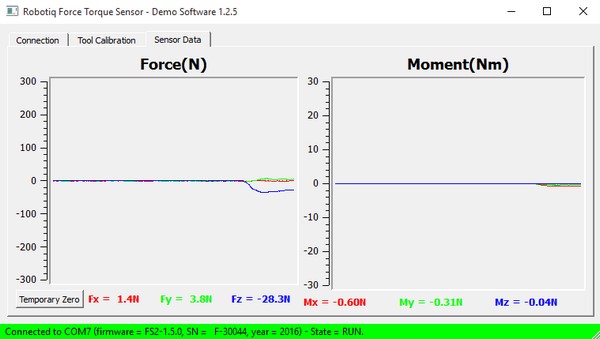
The sensor outputs the force and moment data according to a reference, i.e. a zero value. In order to compensate for any deviation of this reference, Robotiq provides a feature which allows the sensor to automatically compute and compensate the installation offset, the weight of the tool and its center of mass.
Warning
The sensor must be re-calibrated after each uninstall / install on the robot. Mounting screws will induce internal stress that needs to be compensated for. Not doing so will significantly affect the sensor signal.
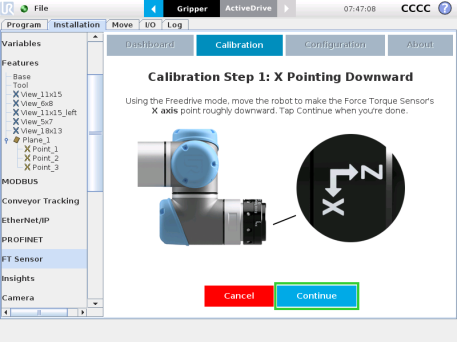
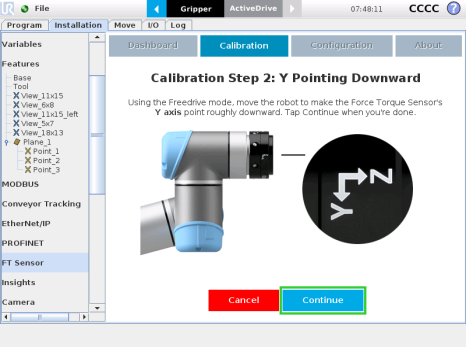
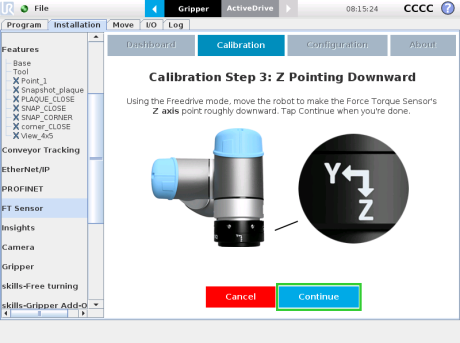
The procedure requires moving the robot arm in three configurations for which each orientation of the tool is different. Using an internal accelerometer, the sensor is then able to associate the measurements corresponding to the tool alone for each orientation. After the procedure is completed, the sensor will output the force and moment values measured without the effect of the weight of the tool and the installation offset.
Info
You need the Universal Robots software package installed first. Please refer to the Installation for Universal Robots section for the package download and installation.

Info
Recalibration is recommended in the event of an error message displaying the incorrect orientation of the FT Sensor during at least one calibration step.
Info
You need the Visual Demo Software installed first. Please refer to the Visual Demo Software section for download and installation.
To calibrate your FT Sensor:

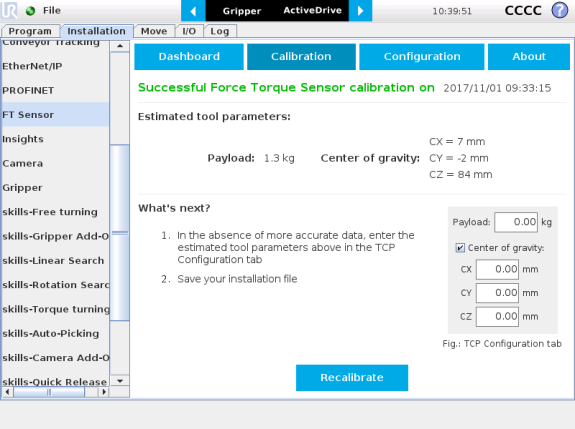
The payload and center of gravity values can be accessed through the Calibration menu in the Installation tab, after the calibration is completed. They include the mass and center of gravity of the Sensor.
Caution
The mass, payload or center of gravity of anything found under the Sensor (i.e. tool changer) will not be taken into account in the calculation of the payload.
Warning
Make sure to save the installation file after performing the calibration. Saving will record the calibration date and estimate tool parameters.
Tip
Prior to installing the ActiveDrive toolbar, the Sensor Driver package should be installed.
Info
The URCaps package contains the ActiveDrive Toolbar. Therefore, installing the URCap package also installs the toolbar. If you have installed the URCap, you do not need to install the ActiveDrive Toolbar. This section applies to Robotiq’s software installation when not using the URCap. If you wish to install the URCap package, refer to the Force Copilot URCap Package section.
Tip
Make sure your PolyScope version is up-to-date and that your controller is compatible with the driver package for UR (refer to the Installation for Universal Robots section for controller compatibility). To view your PolyScope version, go to the home page of the teach pendant and tap the About button. A window containing the Universal Robots software version will pop up.
Warning
Verify that the Force Torque Sensor is aligned with the robot arm using the dowel pin, or at least make sure the holes are aligned. This ensures that the Sensor’s axes are aligned with the robot’s and that the ActiveDrive will work correctly.
To install the ActiveDrive toolbar :
Info
To get detailed information on how to use the ActiveDrive Toolbar, refer to the ActiveDrive Toolbar section.
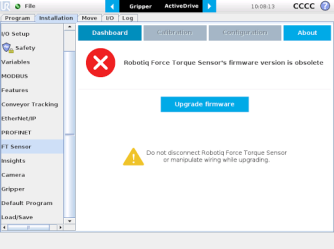
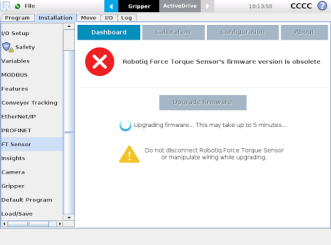
A firmware upgrade might be necessary when updating the Force Copilot URCap. From the PolyScope home page, go to Program Robot and tap the Installation tab. Select FT Sensor in the left pane and tap the Dashboard button. If an upgrade is needed, the Upgrade firmware button will display. Tap the button and wait for the upgrade to be completed.
Warning
Do not disconnect the Sensor during firmware upgrade.
|
|
|
|
|
Wait while the software is upgraded. |
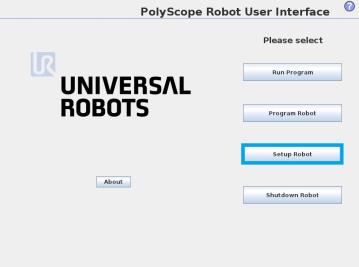
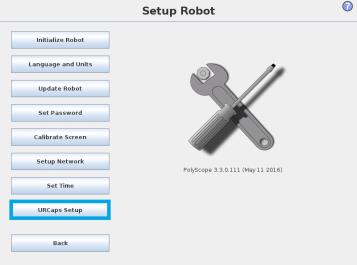
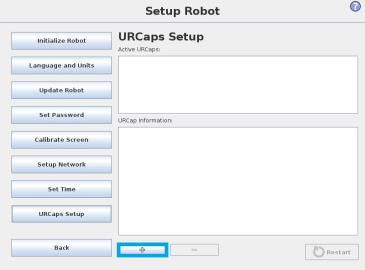
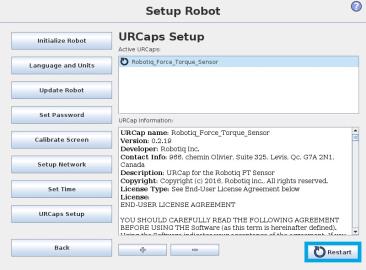
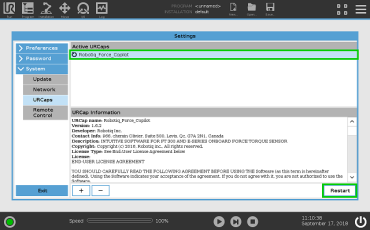
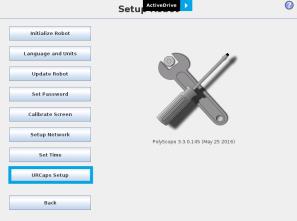
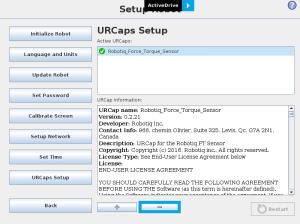
If you wish to uninstall the Force Copilot URCap, follow this procedure:
|
|
Go to Setup Robot. |
|
|
Tap URCaps Setup. |
|
|
|
END-USER LICENSE AGREEMENT
YOU SHOULD CAREFULLY READ THE FOLLOWING AGREEMENT BEFORE USING THE SOFTWARE (as this term is hereinafter defined). Using the Software indicates your acceptance of the agreement. If you do not agree with it, you are not authorized to use the Software.
IMPORTANT, READ CAREFULLY: This End-User License Agreement (the “Agreement”) is a legal agreement between you and the Licensor (as this term is hereinafter defined), the licensor of the Software. This Agreement covers the Software. The Software includes any “on-line” or electronic documentation and all modifications and upgrades related thereto. By downloading, installing, or otherwise using the Software, you agree to be bound by the terms of this Agreement. If you do not agree to the terms of this Agreement, the Licensor cannot and does not license the Software to you. In such event, you must not download, use or install the Software.
1. Definition.
1.1. “UR” means Universal Robots A/S, a corporation incorporated under the laws of Denmark, having its registered office at Energivej 25, DK-5260 Odense S, which specializes into the conception, advanced manufacturing and sale of robotic products (the “UR’s Business”);
1.2. “Software” means any of the Licensor’s software provided to its customers for the purposes mentioned in sub-section 2.2 hereof including their modifications and upgrades and their related materials;
1.3. “Licensor” means Robotiq inc., a corporation incorporated under the laws of Quebec, having its registered office at 500-966 chemin Olivier, Lévis, Québec, Canada, G7A 2N1, which specializes into the conception, advanced manufacturing and sale of robotic products (the “Licensor’s Business”);
1.4. “End-User” means a customer authorized pursuant to this Agreement to install or use the Software with a specific product of the UR’s Products;
1.5. “Licensor’s Products” means those robotic products developed by the Licensor in the course of the Licensor’s Business;
1.6. “UR’s Products” means those products developed by UR in the course of the UR’s Business;
1.7. “Licensor’s Authorized Representatives” means and includes the Licensor and Licensor’s authorized vendors, resellers, distributors and licensors;
1.8. “Designated Equipment” means a personal computer that has a functional USB port and an operating system that is an equivalent or a more recent version of one of the following:
1.9. “Purchase Agreement” means an agreement between the End-User and the Licensor pursuant to which the End-User purchased one or more of the Licensor’s Products;
1.10. “Trial Period” means the limited period during which the Software may be installed on the UR’s Product and used without any charge by the End-User in order to be used without a Licensor’s Product.
2. License and Object of the Agreement.
2.1. License. Subject to the terms and conditions hereof, the Licensor grants to the End-User a personal, temporary, non-exclusive, non-assignable and non-transferable and revocable license to use the Software in accordance with the terms and conditions hereof.
2.2. Object of the Agreement. The object of this Agreement is the grant of a license for the use of software that enables control functionalities of UR’s Products devices or Licensor’s Products (the “Purpose”).
3. Software and Documentation.
3.1. Download. The Software shall be downloaded from the Licensor’s website or provided to the End-User through a USB flash drive, according to the instructions set forth in the order summary sent to the End-User by email or by other means of communication, as decided by the Licensor (the “Order Summary”). The download of the Software shall be made with the End-User’s Designated Equipment.
3.2. Installation. The installation on the UR’s Product shall be done with a USB flash drive inserted into the UR’s Product. If the Software was downloaded from the Licensor’s website, it shall be uploaded on a USB flash drive device for the purpose of installation on the UR’s Product.
3.3. Utilisation. Two scenarios are possible according to the modalities set forth in the Order Summary:
a) The use of the Software is made with a Licensor’s Product. In this case, the End-User may start using the Software upon completed installation.
b) The use of the Software is made without a Licensor’s product. In this case, a Trial Period is granted to the End-User. At the end of the Trial Period, which shall be set forth in the Order Summary, the use of the Software requires the software protection dongle (the “Dongle”). The Dongle will be provided to the End-User for a fee as per section 5 of this Agreement, either by the Licensor or by a Licensor’s Authorized Representative.
3.4. Documentation. The Licensor may provide, if applicable, all documentation containing the detailed specifications for operation and use of the Software, which Software shall be used in accordance with such documentation. This documentation, if applicable, will be provided, wholly or in part, within (i) this Agreement, (ii) the Licensor’s Web site http://robotiq.com/ (iii) the Licensor’s Products and the Purchase Agreement therewith, or (iv) any other agreement, document, support, whatsoever decided by the Licensor.
4. Modifications and Upgrades. The Licensor shall be under no obligation to provide any upgrade, modification or patch to the Software. However, the End-User shall be entitled to receive free of charge the upgrades and patches of the Software provided by the Licensor if, at such time, the End-User is not in default in respect of any of its obligations contained herein. Modifications that create new functionalities may be offered to the End-User at a price set by the Licensor at its sole discretion.
Such modifications, upgrades and patches of the Software shall be installed by the End-User itself by consulting the Licensor’s website http://robotiq.com/ where a link to proceed to such installation will be made available thereof.
5. Fees. The End-User shall pay the Licensor for using the software as per the Order Summary. The fees shall cover upgrades and patches of the Software provided by the Licensor if, at the time of the upgrade or patch, the End-User is not in default in respect of any of its obligations contained herein.
New End-Users not using the Licensor’s Products will be entitled to a Trial Period, which shall begin on the date of the first installation on the UR’s Product and which shall end after the Trial Period as determined in the Order Summary.
6. Maintenance. During the term of this Agreement, the Licensor will maintain the Software in an operable condition and will make available any corrections and improvements as are generally incorporated in the Software by the Licensor without additional charge to the End-User.
7. Title to Software. The licensed Software is composed of confidential data and trade secrets and is proprietary to and constitutes trade secret information and intellectual property of the Licensor. Title and ownership rights to the Software, including the intellectual property rights related thereto, shall remain with the Licensor. The End-User agrees to maintain the confidential nature of the source code and libraries.
The license granted herein does not include the right to sublicense to others, and may not be assigned to others, in whole or in part, without the prior written consent of the Licensor. The End-User may not or allow others to modify or prepare derivative works, copy (except for normal backups for recovery purposes), reproduce, republish, reverse engineer, upload, post, transmit, or distribute, in any manner, the Software.
8. Restricted Use. The Software shall be used solely and exclusively by the End-User and its employees for the Purpose mentioned in sub-section 2.2 hereof. Any other use of the Software, including resell derivative modifications or extensions, is expressly prohibited.
9. Audit. During the term of this Agreement and for six (6) months after the termination, the Licensor shall have the right, during normal business hours and upon reasonable advance notice to the End-User, to visit the End-User’s premises for the purpose of auditing the End-User’s use of the Software to confirm that such use is in accordance with this Agreement or to confirm that the End-User has ceased the use of the Software after the termination of the Agreement. The costs of such audit shall be borne by the Licensor unless it determines that the End-User has underpaid it for any twelve-month period by five per cent (5%) or more or that the use of the Software is not in accordance with the Agreement; in such case, the End-User shall pay the costs of the audit and such underpayment.
10. Exclusion of Warranty on Software. The End-User expressly acknowledges and agrees that use of the Software is at the End-User sole risk. The Software is provided “as is”. The Licensor warrants that, during the term of this Agreement and except if modified by the End-User, the Software will meet in all material respects the specifications provided for in the Licensor’s website.
11. Limitation of liability. To the maximum extent permitted by law, the Licensor and Licensor’s Authorized Representatives shall not be liable for any indirect, incidental or consequential damages for breach of any express or implied warranty, breach of contract, negligence, strict liability or any other legal theory related to the Software. Such damages include, but are not limited to, loss of profits, loss of revenue, loss of data, loss of use of the product or any associated equipment, down time and user’s time, even if the Licensor has been advised of the possibility of such damages. In any case, the Licensor’s entire liability under any provision of this agreement shall be limited to the amount actually paid in respect of the Licensor’s products purchased by the end-user pursuant to a purchase agreement.
12. Indemnification. The End-User shall indemnify and hold the Licensor harmless from any liability, loss, claim and from any judgment, damage and cost (including, without limitation, the costs and fees of a dispute and reasonable legal fees), fine, penalty and interest whatsoever arising from any defence, dispute, compensation, claim or counterclaim as a result of the use of the Software by any third party authorized by the End-User.
13. Training, Maintenance and Support. There is no entitlement to training, maintenance and support under this license unless otherwise specified in the Purchase Agreement or any other written agreement between the End-User and the Licensor. The End-User may provide the Licensor with details regarding any bug, defect or failure in the Software promptly and with no delay from such event; the End-User shall comply with the Licensor’s request for information regarding bugs, defects or failures and furnish him with information, screenshots and try to reproduce such bugs, defects or failures upon Licensor’s demand.
14. Expiration and Termination. The Licensor may terminate this Agreement for default by the End-User by sending a ten (10) day notice to the End-User.
Upon the termination of this Agreement for any reason, the End-User shall promptly uninstall the Software on any UR’s Products and Licensor’s Products, computer, or server on which it has been installed, deliver to the Licensor all CDs, DVDs, USB flash drives, and other tangible items and materials embodying the Software, and return to the Licensor all copies thereof or destroy such copies and warrant in writing that all copies thereof have been destroyed or deleted. In the event of the termination of this Agreement, all obligations of the parties under this Agreement due for performance on the date of termination shall survive the termination, and the party terminating shall not be liable to the other party for any damages arising out of the termination.
15. Miscellaneous.
15.1. This Agreement constitutes the entire understanding and agreement between the Licensor and the End-User and replaces any prior agreement relating to the same subject matter.
15.2. This Agreement shall be governed and construed in accordance with the laws of the province of Quebec and the federal laws of Canada applicable therein. Any legal action or proceeding between the Licensor and the End-User for any purpose concerning this Agreement or the parties' obligations hereunder shall be brought exclusively in a court of competent jurisdiction sitting in the judicial district of Québec, Québec.
15.3. The Licensor’s failure to insist upon or enforce strict performance of any provision of this Agreement shall not be construed as a waiver of any provision or right. Neither the course of conduct between the parties nor trade practice shall act to modify any provision of this Agreement.
15.4. The Licensor may assign its rights and duties under this Agreement to any party at any time without notice to the End-User. The End-User may not assign this Agreement without the prior written consent of the Licensor.
15.5. If any part of this Agreement is null, illegal or non-enforceable, this Agreement shall be interpreted as if this part was never part of this Agreement.
15.6. The provisions of this Agreement are for the benefit of the Licensor and its officers, directors, employees, agents, licensors and suppliers. Each of these individuals or entities shall have the right to assert and enforce those provisions directly against the End-User on its own behalf. This Agreement is also for the benefit of, and binds, the End-User and its heirs, successors, legal representatives and permitted assigns.
15.7. The Licensor hereby confirms that there is no relationship of agency between the Licensor and UR, and that they are independent contractors.
15.8. Any rights not expressly granted herein are reserved.
15.9. The parties confirm that they have agreed that this Agreement and all related documents be drafted in English only. Les parties aux présentes confirment qu’elles ont accepté que la présente convention et tous les documents y afférents soient rédigés en anglais seulement.
If your Universal Robots controller is not compatible with the URCaps package (refer to the Installation for Universal Robots section for compatibility), you can install the driver package and ActiveDrive Toolbar separately.
The ActiveDrive Toolbar allows to easily move the robot by hand guiding it. This section applies to Robotiq’s software installation when not using URCaps.
Info
The driver package and the ActiveDrive toolbar have separate installation processes. The driver package is independant from the ActiveDrive toolbar, but has to be installed beforehand if you wish to install the ActiveDrive toolbar.
Info
The URCap package contains the driver package. Therefore, installing the URCap package also installs the driver package. If you have installed the URCap, you do not need to install the driver package. This section applies to Robotiq’s software installation when not using the URCap. If you wish to install the URCap package, refer to the Force Copilot URCap Package section.
Caution
Make sure your PolyScope version is up-to-date and that your controller is compatible with the driver package for UR (refer to the Installation for Universal Robots section for controller compatibility). To view your PolyScope version, go to the home page of the teach pendant and tap the About button. A window containing the Universal Robots software version will pop up.
To install the driver package, follow this procedure:
If the Force Torque Sensor is mounted on the robot for the first time, calibration must be performed. Refer to the Calibration Procedure section for details.
Warning
The Sensor must be calibrated after each uninstall / install on the robot. Mounting screws will induce internal stress that needs to be compensated for. Not doing so will significantly affect the Sensor signal.
Info
To get detailed information on how to program in PolyScope using the Force Torque Sensor signals, refer to the Using the force and torque values section.
A single status LED provides information on both Sensors, detailed information can be found in the tables below, while a representation of both Sensor status LEDs is shown in the figure below.
On the FT 300 Sensor, the cable sleeve is the LED conductor:
|
COLOR |
LED STATE |
INFORMATION |
|---|---|---|
|
- |
off |
No power |
|
Blue / red |
on |
FT 300 Sensor is booting |
|
Red |
on |
FT 300 Sensor is functional, no communication detected |
|
Red |
blinking |
FT 300 Sensor fault detected |
|
Blue |
on |
FT 300 Sensor is functional, communication established |
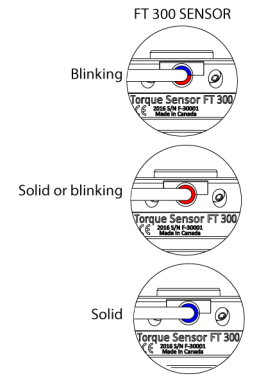
Fig. 3.6: FT Sensor status LED.