Info
Unless specified, all values in this section are in hexadecimal values.
Tip
Robotiq suggests using the Robotiq User Interface test software to explore the various features of the Gripper, like object detection and force control.
Since the Robotiq Hand-E Gripper has its own embedded controller, high-level commands, such as "Go to requested position" are used to control it.
Info
The operator can:
- Control force, speed and position of the Gripper fingers.
- Finger movement is always synchronized, movement is initiated via a single "Go to requested position" command.
- Parallel or encompassing grip is performed automatically.
- A built-in object detection feature is available; the user can be notified after an object is picked once the "Go to" command has been initiated.
- Engage directional (open or close) auto-release for emergencies.
Control using registers
The Gripper has an internal memory that is shared with the robot controller. One part of the memory is for the robot output; gripper functionalities. The other part of the memory is for the robot input; gripper status. Two types of actions can then be performed by the robot controller :
The Gripper Register Mapping section will map the different registers used to control the Gripper or to read its status while theRobot Output Registers & Functionalities section will detail the output (write) register functions, and the Robot Input Registers & Status section will detail the input (read) register status. The figure below is a representation of the memory and the control logic of the Gripper.
Fig. 4-1: Hand-E control logic overview
Control using Universal Robots packages
Robotiq provide Universal Robots packages to be used with URCaps (require controller CB3 or higher)
Please refer to the Control over Universal Robots with URCaps section for instructions on how to use the Gripper URCap; this method will provide you with a Gripper Toolbar to test and a Gripper node to program via the URCaps tab.
Please refer to the Control over Universal Robots without URCaps section on how to use without URcaps, this method will provide you with a similar Gripper Toolbar but the robot program will be built using subprograms and scripts.
Register mapping
Caution
Byte numbering starts at zero and not at 1 for the functionalities and status registers.
|
Register |
Robot Output / Functionalities |
Robot Input / Status |
|---|---|---|
|
Byte 0 |
ACTION REQUEST |
GRIPPER STATUS |
|
Byte 1 |
RESERVED |
RESERVED |
|
Byte 2 |
RESERVED |
FAULT STATUS |
|
Byte 3 |
POSITION REQUEST |
POS REQUEST ECHO |
|
Byte 4 |
SPEED |
POSITION |
|
Byte 5 |
FORCE |
CURRENT |
|
Byte 6 to 15 |
RESERVED |
RESERVED |
Table 4-1: Registers of the Hand-E Gripper.
Register: ACTION REQUEST
Address: Byte 0
|
Bits |
7 |
6 |
5 |
4 |
3 |
2 |
1 |
0 |
|---|---|---|---|---|---|---|---|---|
|
Symbols |
Reserved |
rARD |
rATR |
rGTO |
Reserved |
rACT |
||
rACT
First action to be made prior to any other actions; the rACT bit will activate the Gripper. Clear the rACT bit to reset the Gripper and clear any fault status.
Warning
When setting rACT (rACT ==1), the Gripper will begin movement to complete its activation feature.
Info
Power loss will set rACT (rACT == 1); the rACT bit must then be cleared (rACT == 0), then set again to allow operation of the Gripper.
Caution
The rACT bit must stay on afterwards for any other action to be performed.
rGTO
The "Go To" action moves the Gripper fingers to the requested position using the configuration defined by the other registers, rGTO will engage motion while bytes 3, 4 and 5 will determine aimed position, force and speed. The only motions performed without the rGTO bit are activation and automatic release routines.
rATR
Automatic Release routine action slowly opens the Gripper fingers until all motion axes reach their mechanical limits. After all motions are completed, the Gripper sends a fault signal and needs to be reinitialized before any other motion is performed. The rATR bit overrides all other commands excluding the activation bit (rACT).
Caution
The automatic release is meant to disengage the Gripper after an emergency stop of the robot.
The automatic release is not intended to be used under normal operating conditions.
Automatic release requires the rACT to be cleared (rACT == 0) then set (rACT == 1).
rARD
Auto-release direction. When auto-releasing, rARD commands the direction of the movement. The rARD bit should be set prior to or at the same time as the rATR bit, as the motion direction is set when the auto-release is initiated.
Register: GRIPPER OPTIONS
Address: Byte 1
|
Bits |
7 |
6 |
5 |
4 |
3 |
2 |
1 |
0 |
|---|---|---|---|---|---|---|---|---|
|
Symbol |
Reserved |
|||||||
Register: GRIPPER OPTIONS 2
Address: Byte 2
|
Bits |
7 |
6 |
5 |
4 |
3 |
2 |
1 |
0 |
|---|---|---|---|---|---|---|---|---|
|
Symbol |
Reserved |
|||||||
Register: POSITION REQUEST
Address: Byte 3
|
Bits |
7 |
6 |
5 |
4 |
3 |
2 |
1 |
0 |
|---|---|---|---|---|---|---|---|---|
|
Symbol |
rPR |
|||||||
This register is used to set the target position for the Gripper's fingers. The positions 0x00 and 0xFF correspond respectively to the fully opened and fully closed mechanical stops. For detailed finger trajectory, please refer to the Specifications section.
Info
The activation will allow the Gripper to adjust to any fingers/fingertips. No matter what is the size and/or shape of the fingers/fingertips, 0 will always be fully opened and 245 fully closed, with a quasi-linear relationship between the two values.
Register: SPEED
Address: Byte 4
|
Bits |
7 |
6 |
5 |
4 |
3 |
2 |
1 |
0 |
|---|---|---|---|---|---|---|---|---|
|
Symbol |
rSP |
|||||||
This register is used to set the Gripper closing or opening speed in real time, however, setting a speed will not initiate a motion.
Register: FORCE
Address: Byte 5
|
Bits |
7 |
6 |
5 |
4 |
3 |
2 |
1 |
0 |
|---|---|---|---|---|---|---|---|---|
|
Symbol |
rFR |
|||||||
The force setting defines the final gripping force for the Gripper. The force will fix the maximum current sent to the motor . If the current limit is exceeded, the fingers stop and trigger an object detection notification. Please refer to the Picking Features section for details on force control.
Info
Register bytes 6 to 15 are reserved and should be set to 0.
Register: GRIPPER STATUS
Address: Byte 0
|
Bits |
7 |
6 |
5 |
4 |
3 |
2 |
1 |
0 |
|---|---|---|---|---|---|---|---|---|
|
Symbols |
gOBJ |
gSTA |
gGTO |
Reserved |
gACT |
|||
gACT
Activation status, echo of the rACT bit (activation bit).
gGTO
Action status, echo of the rGTO bit (go to bit).
gSTA
Gripper status, returns the current status and motion of the Gripper fingers.
gOBJ
Object detection status, is a built-in feature that provides information on possible object pick-up. Ignore if gGTO == 0.
Caution
In some circumstances the object detection feature may not detect an object even if it is successfully grasped. For instance, picking up a thin object may be successful without the object detection status being triggered. In such applications, the "Fingers are at requested position" status of register gOBJ is sufficient to proceed to the next step of the routine.
Tip
Checking for the correct position of the fingers (byte 4), as well as object detection (byte 0, bit 6 & 7) before proceeding to the next step of a routine is a more reliable method than object detection or finger position alone.
Register: RESERVED
Address: Byte 1
|
Bits |
7 |
6 |
5 |
4 |
3 |
2 |
1 |
0 |
|---|---|---|---|---|---|---|---|---|
|
Symbol |
Reserved |
|||||||
Register: FAULT STATUS
Address: Byte 2
|
Bits |
7 |
6 |
5 |
4 |
3 |
2 |
1 |
0 |
|---|---|---|---|---|---|---|---|---|
|
Symbols |
kFLT |
gFLT |
||||||
gFLT
Fault status returns general error messages that are useful for troubleshooting. Fault LED (red) is present on the Gripper chassis, LED can be blue, red or both and be solid or blinking.
Minor faults (solid red LED)
Major faults (LED blinking red/blue) - Reset is required (rising edge on activation bit (rACT) needed).
Info
While booting, status LED will be solid blue/red.
kFLT
please refer to your optional controller manual (input registers and status).
Register: POSITION REQUEST ECHO
Address: Byte 3
|
Bits |
7 |
6 |
5 |
4 |
3 |
2 |
1 |
0 |
|---|---|---|---|---|---|---|---|---|
|
Symbol |
gPR |
|||||||
gPR
Echo of the requested position for the Gripper, value between 0x00 and 0xFF.
Register: POSITION
Address: Byte 4
|
Bits |
7 |
6 |
5 |
4 |
3 |
2 |
1 |
0 |
|---|---|---|---|---|---|---|---|---|
|
Symbol |
gPO |
|||||||
gPO
Actual position of the Gripper obtained via the encoders, value between 0x00 and 0xFF.
Register: CURRENT
Adress: Byte 5
|
Bits |
7 |
6 |
5 |
4 |
3 |
2 |
1 |
0 |
|---|---|---|---|---|---|---|---|---|
|
Symbol |
gCU |
|||||||
gCU
The current is read instantaneously from the motor drive, value between 0x00 and 0xFF, approximate current equivalent is 10 * value read in mA.
Tip
Built-in features like object detection and force control use the fingers' electrical current readings. The user does not need to create these features.
As stated in previous sections, object picking is done via a simple "Go To" command, rGTO bit calls for movement, while rPR byte is the aimed position, rSP and rFR will be the desired speed and force settings respectively. This section describes key features in object picking applications:
The gripping force is controlled via the rFR byte (please refer to the Robot Output Registers & Functionalities section).The Gripper behavior will change according to the rFR force requested.
Measured grip force for steel of specific hardness (Vickers)
Coming soon
Measured grip force for silicone of specific hardness (Durometer)
Coming soon
Re-grasp feature is a built-in feature meant to prevent object lost due to slipping or inaccurate initial grip. The Re-grasp feature will allow the Gripper to initiate a movement when an object is slipping or dropped. When Re-grasping, the Gripper will attempt to close until it reaches the position request (rPR).
Info
Feature is off at force request rFR = 0, otherwise it is on.
Info
While your initial settings for force and speed are not used for Re-grasp, they will never be eceeded to prevent damaging the part.
Caution
The rOBJ status is cleared when a motion is detected.
When the Gripper grabs an object, the gOBJ status will allow you to know if contact with the object was successful. This is a built-in feature for adaptive grippers meant to be used by the robot controller (or PLC) commanding the overall application. The Object detection feature will change the gOBJ status and can be used inside your robot program.
As stated in the previous section:
gOBJ: Only valid if gGTO = 1.
Example of contact detected with an object:
Example of contact lost with an object:
The Hand-E Gripper is equipped with a brake that engages at the end of each and every Gripper move, and thus disengages between each of these moves.
For instance, when fully closing on an object, the Gripper makes contact with the surface of the object and activates the brake before sending the object detection signal to the robot.
Fig. 4-2: Example of Gripper control logic with corresponding registers.
The Gripper can be controlled by Modbus RTU directly with RS485 or over USB using the ACC-ADT-USB-RS485. This section is intended to provide guidelines for setting up a Modbus master that will adequately communicate with the Gripper.
For a general introduction to Modbus RTU and for details regarding the CRC algorithm, the reader is invited to read the Modbus over serial line specification and implementation guide available at: http://www.modbus.org/docs/Modbus_over_serial_line_V1_02.pdf.
For debugging purposes, the reader is also invited to download one of many free Modbus scanners such as the CAS Modbus Scanner from Chipkin Automation Systems available at: http://www.store.chipkin.com/products/tools/cas-modbus-scanner.
Info
Modbus RTU is a communication protocol based on a Big Endian byte order. Therefore, the 16-bit register addresses are transmitted with the most significant byte first. However, the data port is in the case of Robotiq products based on the Little Endian byte order. As such, the data parts of Modbus RTU messages are sent with the less significant byte first.
Tip
Modbus RTU specifications and details can be found at www.modbus.org.
The following table describes the connection requirements for controlling the Gripper using the Modbus RTU protocol.
|
PROPRIETY |
DEFAULT VALUE |
|---|---|
|
Physical Interface |
RS-4851 |
|
Baud Rate2 |
115,200 bps |
|
Data Bits |
8 |
|
Stop Bit2 |
1 |
|
Parity2 |
None |
|
Supported Functions |
Read Holding Registers (FC03) Read Input Registers (FC04) Preset Multiple Registers (FC16) Master read & write multiple registers (FC23) |
|
Exception Responses |
Not supported |
|
Slave ID2 |
0x0009 (9) |
|
Robot Output / Gripper Input First Register |
0x03E8 (1000) |
|
Robot Input / Gripper Output First Register |
0x07D0 (2000) |
|
Termination Resistor2 |
120 ohms |
1 Various converters are available in the Spare Parts, Kits and Accessories section.
2 These parameters can be adjusted using the Robotiq User Interface.
Each register (word - 16 bits) of the Modbus RTU protocol is composed of 2 bytes (8 bits) from the Gripper. The first Gripper output Modbus register(0x07D0) is composed from the first 2 Robotiq Gripper bytes (byte 0 and byte 1).
Info
200 Hz is the maximum speed when commanding / reading from the Robotiq Gripper. It is therefore recommended to send commands with a minimum delay of 5 ms between them.
Info
120 Ohms termination resistor is already present on the converter and the Gripper. If multiple grippers are connected in parallel on the same RS485 cable, termination resistor must be set to OFF in communication parameters.
Function code 03 (FC03) is used for reading the status of the Gripper (robot input). Examples of such data are Gripper status, object status, finger position, etc.
Example of an FC03 read function:
This message asks for register 0x07D0 (2000) and register 0x07D1 (2001) which contains Gripper Status, Object Detection, Fault Status and Position Request Echo.
Request is: 09 03 07 D0 00 02 C5 CE
|
Bits |
Description |
|---|---|
|
09 |
SlaveID |
|
03 |
Function Code 03 (Read Holding Registers) |
|
07D0 |
Address of the first requested register |
|
0002 |
Number of registers requested (2) |
|
C5CE |
Cyclic Redundancy Check (CRC) |
Response is: 09 03 04 E0 00 00 00 44 33
|
Bits |
Description |
|---|---|
|
09 |
SlaveID |
|
03 |
Function Code 03 (Read Holding Registers) |
|
04 |
Number of data bytes to follow (2 registers x 2 bytes/register = 4 bytes) |
|
E000 |
Content of register 07D0 |
|
0000 |
Content of register 07D1 |
|
4433 |
Cyclic Redundancy Check (CRC) |
Function code 04 (FC04) is used for requesting the status of the Gripper's analog input register. Examples of such data are Gripper status, object status, finger position, etc.
Example of an FC04 read function:
This message asks for register 0x07D0 (2000) and register 0x07D1 (2001) which contains Gripper Status, Object Detection, Fault Status and Position Request Echo.
Request is: 09 04 07 D0 00 02 70 0E
|
Bits |
Description |
|---|---|
|
09 |
SlaveID |
|
04 |
Function Code 04 (Read Input Registers) |
|
07D0 |
Address of the first requested register |
|
0002 |
Number of registers requested (2) |
|
700E |
Cyclic Redundancy Check (CRC) |
Response is: 09 04 04 E0 00 00 00 44 33
|
Bits |
Description |
|---|---|
|
09 |
SlaveID |
|
04 |
Function Code 04 (Read Holding Registers) |
|
04 |
Number of data bytes to follow (2 registers x 2 bytes/register = 4 bytes) |
|
E000 |
Content of register 07D0 |
|
0000 |
Content of register 07D1 |
|
4584 |
Cyclic Redundancy Check (CRC) |
Function code 06 (FC16) is used to activate functionalities of the Gripper (robot output). Examples of such data are action request, speed, force, etc.
Example of setting multiple registers FC16:
This message requests to set position request, speed and force of the Gripper by setting register 0x03E9 (1002) and 0x03EA.
Request is: 09 10 03 E9 00 02 04 60 E6 3C C8 EC 7C
|
Bits |
Description |
|---|---|
|
09 |
SlaveID |
|
10 |
Function Code 16 (Preset Multiple Registers) |
|
03E9 |
Address of the first register |
|
0002 |
Number of registers written to |
|
04 |
Number of data bytes to follow (2 registers x 2 bytes/register = 4 bytes) |
|
60E6 |
Value written to register 0x03E9 |
|
3CC8 |
Value written to register 0x03EA |
|
EC7C |
Cyclic Redundancy Check (CRC) |
Response is: 09 10 03 E9 00 02 91 30
|
Bits |
Description |
|---|---|
|
09 |
SlaveID |
|
10 |
Function Code 16 (Preset Multiple Registers) |
|
03E9 |
Address of the first register |
|
0002 |
Number of written registers |
|
9130 |
Cyclic Redundancy Check (CRC) |
Function code 23 (FC23) is used for reading the status of the Gripper (robot input) and activating functionalities of the Gripper (robot output) simultaneously. Examples of such data are Gripper status, object status, finger position, etc. Action requests are speed, force, etc.
Example of reading and writing multiple registers FC23:
This message reads registers 0x07D0 (2000) and 0x07D1 (2001), which contains Gripper Status, Object Detection, Fault Status and Position Request Echo. It also sets the position request, speed and force of the Gripper by writing to registers 0x03E9 (1001) and 0x03EA (1002).
Request is: 09 17 07 D0 00 02 03 E9 00 02 04 00 E6 3C C8 2D 0C
|
Bits |
Description |
|---|---|
|
09 |
SlaveID |
|
17 |
Function Code 23 (read and write multiple registers) |
|
07D0 |
Address of the first requested register, read |
|
0002 |
Number of registers requested (2), read |
|
03E9 |
Address of the first register written to |
|
0002 |
Number of registers written to (3) |
|
04 |
Number of data bytes to follow (2 registers X 2 bytes/registers = 4 bytes) |
|
00E6 |
Value written to register 0x03E9 |
|
3CC8 |
Value written to register 0x03EA |
|
2D0C |
Cyclic Redundancy Check (CRC) |
Response is: 09 17 04 01 00 09 E6 F6 C1
|
Bits |
Description |
|---|---|
|
09 |
SlaveID |
|
17 |
Function Code 23 (read and write multiple registers) |
|
04 |
Number of data bytes to follow (2 registers x 2 bytes/register = 4 bytes) |
|
1000 |
Content of register 07D0 |
|
09E6 |
Content of register 07D1 |
|
F6C1 |
Cyclic Redundancy Check (CRC) |
Note that the content of the response might change depending on the Gripper's status.
Info
The Gripper will execute the input command (i.e.: write), execute one cycle of motion, update the output, then return the Modbus response read.
This section depicts the example from the Control Logic Example section, when programmed using the Modbus RTU protocol. The example is typical of a pick and place application. After activating the Gripper, the robot is moved to a pick-up location to grip an object. It moves again to a second location to release the gripped object.
Step 1: Activation Request ( clear and set rACT)
Request is (clear rAct): 09 10 03 E8 00 03 06 00 00 00 00 00 00 73 30
|
Bits |
Description |
|---|---|
|
09 |
SlaveID |
|
10 |
Function Code 16 (Preset Multiple Registers) |
|
03E8 |
Address of the first register |
|
0003 |
Number of registers written to |
|
06 |
Number of data bytes to follow (3 registers x 2 bytes/register = 6 bytes) |
|
0000 |
Value to write to register 0x03E9 (ACTION REQUEST = 0x01 and GRIPPER OPTIONS = 0x00): rACT = 1 for "Activate Gripper" |
|
0000 |
Value written to register 0x03EA |
|
0000 |
Value written to register 0x03EB |
|
7330 |
Cyclic Redundancy Check (CRC) |
Response is: 09 10 03 E8 00 03 01 30
|
Bits |
Description |
|---|---|
|
09 |
SlaveID |
|
10 |
Function Code 16 (Preset Multiple Registers) |
|
03E8 |
Address of the first register |
|
0003 |
Number of written registers |
|
0130 |
Cyclic Redundancy Check (CRC) |
Request is (set rAct): 09 10 03 E8 00 03 06 01 00 00 00 00 00 72 E1
|
Bits |
Description |
|---|---|
|
09 |
SlaveID |
|
10 |
Function Code 16 (Preset Multiple Registers) |
|
03E8 |
Address of the first register |
|
0003 |
Number of registers written to |
|
06 |
Number of data bytes to follow (3 registers x 2 bytes/register = 6 bytes) |
|
0100 |
Value to write to register 0x03E9 (ACTION REQUEST = 0x01 and GRIPPER OPTIONS = 0x00): rACT = 1 for "Activate Gripper" |
|
0000 |
Value written to register 0x03EA |
|
0000 |
Value written to register 0x03EB |
|
72E1 |
Cyclic Redundancy Check (CRC) |
Response is: 09 10 03 E8 00 03 01 30
|
Bits |
Description |
|---|---|
|
09 |
SlaveID |
|
10 |
Function Code 16 (Preset Multiple Registers) |
|
03E8 |
Address of the first register |
|
0003 |
Number of written registers |
|
0130 |
Cyclic Redundancy Check (CRC) |
Step 2: Read Gripper status until the activation is completed
Request is: 09 03 07 D0 00 01 85 CF
|
Bits |
Description |
|---|---|
|
09 |
SlaveID |
|
03 |
Function Code 03 (Read Holding Registers) |
|
07D0 |
Address of the first requested register |
|
0001 |
Number of registers requested (1) |
|
85CF |
Cyclic Redundancy Check (CRC) |
Response (if the activation IS NOT completed): 09 03 02 11 00 55 D5
|
Bits |
Description |
|---|---|
|
09 |
SlaveID |
|
03 |
Function Code 03 (Read Holding Registers) |
|
02 |
Number of data bytes to follow (1 register x 2 bytes/register = 2 bytes) |
|
1100 |
Content of register 07D0 (GRIPPER STATUS = 0x11, RESERVED = 0x00): gACT = 1 for "Gripper Activation", gSTA = 1 for "Activation in progress" |
|
55D5 |
Cyclic Redundancy Check (CRC) |
Response (if the activation IS completed): 09 03 02 31 00 4C 15
|
Bits |
Description |
|---|---|
|
09 |
SlaveID |
|
03 |
Function Code 03 (Read Holding Registers) |
|
02 |
Number of data bytes to follow (1 register x 2 bytes/register = 2 bytes) |
|
3100 |
Content of register 07D0 (GRIPPER STATUS = 0x31, RESERVED = 0x00): gACT = 1 for "Gripper Activation", gSTA = 3 for "Activation is completed" |
|
4C15 |
Cyclic Redundancy Check (CRC) |
Step 3: Move the robot to the pick-up location
Step 4: Close the Gripper at full speed and full force
Request is: 09 10 03 E8 00 03 06 09 00 00 FF FF FF 42 29
|
Bits |
Description |
|---|---|
|
09 |
SlaveID |
|
10 |
Function Code 16 (Preset Multiple Registers) |
|
03E8 |
Address of the first register |
|
0003 |
Number of registers written to |
|
06 |
Number of data bytes to follow (3 registers x 2 bytes/register = 6 bytes) |
|
0900 |
Value written to register 0x03E8 (ACTION REQUEST = 0x09 and GRIPPER OPTIONS = 0x00): rACT = 1 for "Activate Gripper", rGTO = 1 for "Go to Requested Position" |
|
00FF |
Value written to register 0x03E9 (GRIPPER OPTIONS 2 = 0x00 and POSITION REQUEST = 0xFF): rPR = 255/255 for full closing of the Gripper |
|
FFFF |
Value written to register 0x03EA (SPEED = 0xFF and FORCE = 0xFF): full speed and full force |
|
4229 |
Cyclic Redundancy Check (CRC) |
Response is: 09 10 03 E8 00 03 01 30
|
Bits |
Description |
|---|---|
|
09 |
SlaveID |
|
10 |
Function Code 16 (Preset Multiple Registers) |
|
03E8 |
Address of the first register |
|
0003 |
Number of written registers |
|
0130 |
Cyclic Redundancy Check (CRC) |
Step 5: Read Gripper status until the grip is completed
Request is: 09 03 07 D0 00 03 04 0E
|
Bits |
Description |
|---|---|
|
09 |
SlaveID |
|
03 |
Function Code 03 (Read Holding Registers) |
|
07D0 |
Address of the first requested register |
|
0003 |
Number of registers requested (3) |
|
040E |
Cyclic Redundancy Check (CRC) |
Example of response if the grip is not completed: 09 03 06 39 00 00 FF 0E 0A F7 8B
|
Bits |
Description |
|---|---|
|
09 |
SlaveID |
|
03 |
Function Code 03 (Read Holding Registers) |
|
06 |
Number of data bytes to follow (3 registers x 2 bytes/register = 6 bytes) |
|
3900 |
Content of register 07D0 (GRIPPER STATUS = 0x39, RESERVED = 0x00): gACT = 1 for "Gripper Activation", gGTO = 1 for "Go to Position Request" and gOBJ = 0 for "Fingers are in motion" |
|
00FF |
Content of register 07D1 (FAULT STATUS = 0x00, POSITION REQUEST ECHO = 0xFF): the position request echo tells that the command was well received and that the GRIPPER STATUS is valid. |
|
0E0A |
Content of register 07D2 (POSITION = 0x0E, FINGER CURRENT = 0x0A): the position is 14/255 and the motor current is 100mA (these values will change during motion) |
|
F78B |
Cyclic Redundancy Check (CRC) |
Example of response if the grip is completed: 09 03 06 B9 00 00 FF BD 00 1D 7C
|
Bits |
Description |
|---|---|
|
09 |
SlaveID |
|
03 |
Function Code 03 (Read Holding Registers) |
|
06 |
Number of data bytes to follow (3 registers x 2 bytes/register = 6 bytes) |
|
B900 |
Content of register 07D0 (GRIPPER STATUS = 0xB9, RESERVED = 0x00): gACT = 1 for "Gripper Activation", gGTO = 1 for "Go to Position Request" and gOBJ = 2 for "Fingers have stopped due to a contact while closing" |
|
00FF |
Content of register 07D1 (FAULT STATUS = 0x00, POSITION REQUEST ECHO = 0xFF): the position request echo tells that the command was well received and that the GRIPPER STATUS is valid. |
|
BD00 |
Content of register 07D2 (POSITION = 0xBD, FINGER CURRENT = 0x00): the position is 189/255 (can be used to validate the size of the seized object) |
|
1D7C |
Cyclic Redundancy Check (CRC) |
Step 6: Move the robot to the release location
Step 7: Open the Gripper at full speed and full force
Request is: 09 10 03 E8 00 03 06 09 00 00 00 FF FF 72 19
|
Bits |
Description |
|---|---|
|
09 |
SlaveID |
|
10 |
Function Code 16 (Preset Multiple Registers) |
|
03E8 |
Address of the first register |
|
0003 |
Number of registers written to |
|
06 |
Number of data bytes to follow (3 registers x 2 bytes/register = 6 bytes) |
|
0900 |
Value written to register 0x03E8 (ACTION REQUEST = 0x09 and GRIPPER OPTIONS = 0x00): rACT = 1 for "Activate Gripper", rGTO = 1 for "Go to Requested Position" |
|
0000 |
Value written to register 0x03E9 (GRIPPER OPTIONS 2 = 0x00 and POSITION REQUEST = 0x00): rPR = 0/255 for full opening of the Gripper (partial opening would also be possible) |
|
FFFF |
Value written to register 0x03EA (SPEED = 0xFF and FORCE = 0xFF): full speed and full force |
|
7219 |
Cyclic Redundancy Check (CRC) |
Response is: 09 10 03 E8 00 03 01 30
|
Bits |
Description |
|---|---|
|
09 |
SlaveID |
|
10 |
Function Code 16 (Preset Multiple Registers) |
|
03E8 |
Address of the first register |
|
0003 |
Number of written registers |
|
0130 |
Cyclic Redundancy Check (CRC) |
Step 8: Read Gripper status until the opening is completed
Request is: 09 03 07 D0 00 03 04 0E
|
Bits |
Description |
|---|---|
|
09 |
SlaveID |
|
03 |
Function Code 03 (Read Holding Registers) |
|
07D0 |
Address of the first requested register |
|
0003 |
Number of registers requested (3) |
|
040E |
Cyclic Redundancy Check (CRC) |
Example of response if the opening is not completed: 09 03 06 39 00 00 00 BB 10 30 E0
|
Bits |
Description |
|---|---|
|
09 |
SlaveID |
|
03 |
Function Code 03 (Read Holding Registers) |
|
06 |
Number of data bytes to follow (3 registers x 2 bytes/register = 6 bytes) |
|
3900 |
Content of register 07D0 (GRIPPER STATUS = 0x39, RESERVED = 0x00): gACT = 1 for "Gripper Activation", gGTO = 1 for "Go to Position Request" and gOBJ = 0 for "Fingers are in motion" |
|
0000 |
Content of register 07D1 (FAULT STATUS = 0x00, POSITION REQUEST ECHO = 0x00): the position request echo tells that the command was well received and that the GRIPPER STATUS is valid. |
|
BB10 |
Content of register 07D2 (POSITION = 0xBB, FINGER CURRENT = 0x10): the position is 187/255 and the motor current is 160mA (these values will change during motion) |
|
30E0 |
Cyclic Redundancy Check (CRC) |
Example of response if the opening is completed: 09 03 06 F9 00 00 00 0D 00 56 4C
|
Bits |
Description |
|---|---|
|
09 |
SlaveID |
|
03 |
Function Code 03 (Read Holding Registers) |
|
06 |
Number of data bytes to follow (3 registers x 2 bytes/register = 6 bytes) |
|
F900 |
Content of register 07D0 (GRIPPER STATUS = 0xF9, RESERVED = 0x00): gACT = 1 for "Gripper Activation", gGTO = 1 for "Go to Position Request" and gOBJ = 3 for "Fingers are at requested position" |
|
0000 |
Content of register 07D1 (FAULT STATUS = 0x00, POSITION REQUEST ECHO = 0x00): the position request echo tells that the command was well received and that the GRIPPER STATUS is valid. |
|
0D00 |
Content of register 07D2 (POSITION = 0x0D, FINGER CURRENT = 0x00): the position is 13/255 (the fingers have reached their software limit) |
|
564C |
Cyclic Redundancy Check (CRC) |
Step 9: Loop back to step 3 if other objects have to be gripped.
The URCap package contains many features to program and control the Gripper. The package provides:
Caution
Starting from Gripper URCap version 1.0.2, the gripper activation script command (rq_activate() or rq_activate_and_wait()) must be preceded by the reset command (rq_reset()). This will force the gripper's activation routine. Thus, if the gripper was already activated, it will activate again.
Open or create a robot program
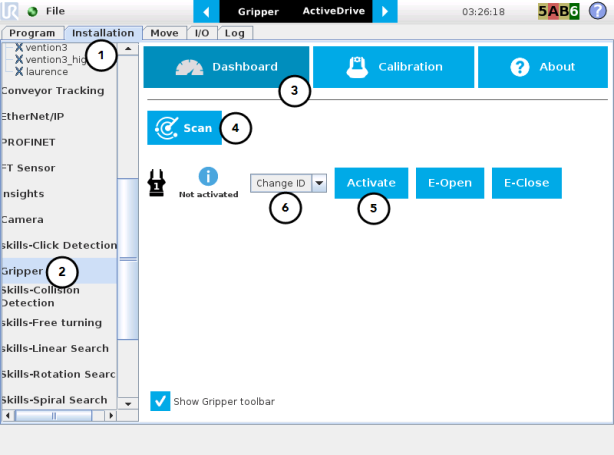
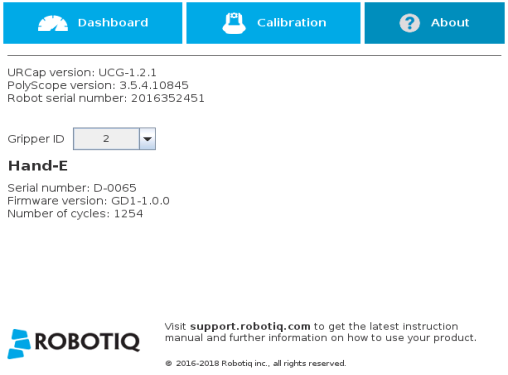
Fig. 4-3: Gripper Dashboard (steps highlighted)
Info
The default Gripper ID allocated to the first device connected is 1.

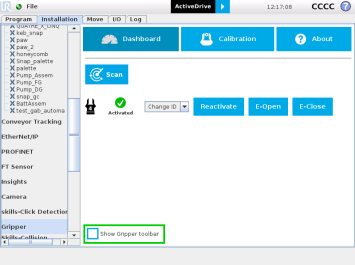
Fig. 4-4: Gripper ID modification in the Gripper Dashboard
Info
The E-Open and E-Close buttons allow the user to open and close the Gripper even if the latter is not activated.
These emergency commands use very low speed and force settings.
Info
The URCap allows the user to connect and control up to 4 Grippers at the same time.
Caution
If you wish to program using multiple grippers at the same time, connect them to the robot one after the other; each Gripper connection requiring its own scan and activation before going on to the next.
For each Gripper connected, follow steps 3 to 6 set out in the Single Gripper section.
|
Icon |
Functionality Name |
Description |
|---|---|---|
|
|
Dashboard |
After selecting Gripper in the left pane of the Installation tab, tap this button to access the Gripper Dashboard. |
|
|
Activate/Reactivate |
The Activate and Reactivate buttons enables the corresponding Gripper. |
|
|
Not activated/Activated |
Gripper status: One or the other of these icons is displayed next to the corresponding Gripper icon. |
|
|
Gripper |
Label indicating the Gripper's ID, ranging from 1 to 4. |
|
|
Scan |
Command allowing for a detection of connected Grippers. After tapping this button, the latter will display in the Gripper Dashboard. |
|
|
Change ID |
Tap the arrow next to the textbox to expand a list of available Gripper IDs. Selecting an available number will allocate it to the corresponding Gripper. |
|
|
E-Open |
Tapping this button sends an emergency open command to the corresponding Gripper, whether it is activated or not. |
|
|
E-Close |
Tapping this button sends an emergency close command to the corresponding Gripper, whether it is activated or not. |
Depending on the fingers/fingertips used, the operator will calibrate the Gripper and measure the stroke by defining the fully open and fully closed positions.
Make sure the Gripper is activated.
Info
A gripper that has not been calibrated will display open and closed values in percentage.
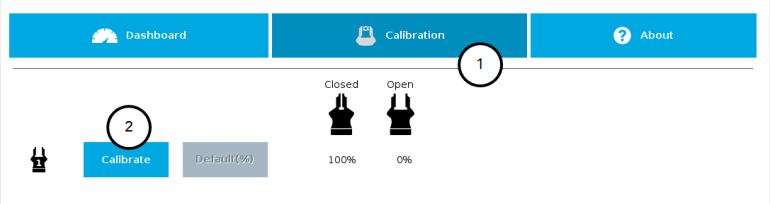
Tapping the Calibrate button in the Gripper Calibration menu launches the Calibration wizard.
Follow the instructions on the screen of the teach pendant.
Tip
Depending on the PolyScope settings defined by the user, the units of measurement can either display according to the metric or imperial system.
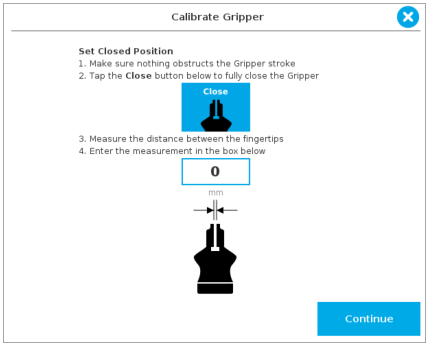
Fig. 4-5: First step of the calibration wizard
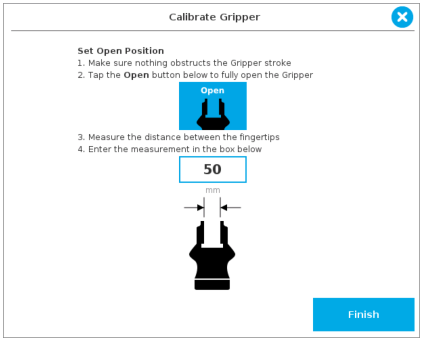
Fig. 4-6: Second step of the calibration wizard
Following their respective calibration, the Grippers will display their actual stroke, from the fully closed to the fully open position.
Fig. 4-7: Single Gripper, calibrated
|
Icon |
Functionality Name |
Description |
|---|---|---|
|
|
Calibration |
After selecting the Gripper in the left pane of the Installation tab, tap this button to access the Gripper Calibration menu. |
|
|
Calibrate/Recalibrate |
The Calibrate and Recalibrate buttons launch the Gripper Calibration wizard. |
|
|
Default (%) |
Following a calibration, tap this button to reset the calibration and return to the default percentage values. The button is greyed out if no calibration has been performed for the corresponding Gripper. |
|
|
Gripper |
Label indicating the Gripper's ID , ranging from 1 to 4. |
|
|
Fully closed dimension table header |
Visual aid above the fully closed dimensions in the Calibration menu. |
|
|
Fully open dimension table header |
Visual aid above the fully open dimensions in the Calibration menu |
|
|
Close |
Tap this button to close the Gripper in the Calibration wizard. |
|
|
Open |
Tap this button to open the Gripper in the Calibration wizard. |
|
|
Fully closed |
Visual aid for entering the fully closed dimension in the Calibration wizard. |
|
|
Fully open |
Visual aid for entering the fully open dimension in the Calibration wizard. |
|
|
Continue |
Tap this button at the end of the first step of the Calibration wizard in order to go to the next step. |
|
|
Finish |
Tap this button at the the end of the Calibration wizard to complete the calibration process for the corresponding Gripper. |
The Gripper Toolbar is generally used to test and jog the Gripper, meaning it has no effect on the programming of the robot.
Info
The Gripper URCap package contains the Gripper toolbar. Therefore, the toolbar is automatically installed with the URCap package. The Gripper toolbar can be installed and used without the URCap package (please refer to the Gripper Toolbar section for information on how to install the toolbar and the driver package without the URCap).
Info
The Gripper toolbar can be installed and used without the URCap package (please refer to the Control over Universal Robots without URCaps section for information on how to install the toolbar and the driver package without the URCap).
Prior to using the Gripper Toolbar, the user needs to go to the Gripper Dashboard and tick the Show Gripper Toolbar. Please refer to the Gripper Dashboard section
Right after the installation of the Gripper URCap, a collapsed Gripper toolbar will display at the top of the screen; please refer to the figure below.

Fig. 4-8: Gripper toolbar (collapsed)
An expanded Gripper Toolbar prior to the activation of the Gripper looks like the figure below:
Fig. 4-9: Gripper Toolbar before activation
Info
The Emergency open and Emergency close buttons allow the user to open and close the Gripper even if the latter is not activated.
The emergency commands use very low speed and force settings.
Caution
If the Gripper has not been calibrated at this point, the Open and Close values will remain in percentage. Please refer to the Gripper Calibration menu and wizard section for instructions.
Once the Gripper is activated, the toolbar can be expanded and used to test and jog the Gripper
Fig. 4-10: Gripper toolbar after activation
If multiple Grippers are used, check one or several Grippers and test their settings and features.
Tip
The first Gripper selected is the "master", meaning that its settings will be copied over to the others when they are selected. In order to modify each Gripper's settings individually, select a Gripper, edit it, uncheck its box and carry on to the next Gripper.
Info
For consistency, selecting multiple Grippers at the same time displays the open and close values in percentage since their stroke might be different.
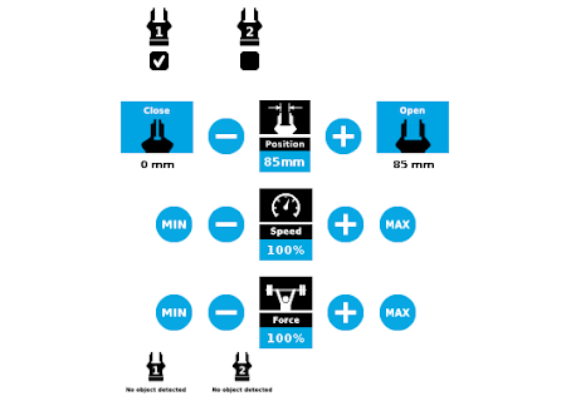
Fig. 4-11: Gripper toolbar (expanded, multiple Grippers)
|
Icon |
Functionality Name |
Description |
|---|---|---|
|
|
Gripper toolbar |
Tap to toggle between the expanded and collapsed Gripper toolbar. When greyed out, the functionality is not available. |
|
|
Activate |
Tap to activate the Gripper. The Gripper will fully open and close to set the zero of the position value. |
|
|
Emergency open |
Slowly moves the Gripper to its fully closed position. |
|
|
Emergency close |
Slowly moves the Gripper to its fully open position. |
|
Primary Icon |
Functionality Name |
Description |
|---|---|---|
|
|
Gripper toolbar |
Tap to toggle between expanded and collapsed Gripper toolbar. When greyed out, the functionality is not available. |
|
|
Open |
Tap to fully open the Gripper. |
|
|
Close |
Tap to fully close the Gripper. |
|
|
Requested position |
Shows the actual position of the Gripper according to the system of units defined in PolyScope (imperial vs. metric). If the Gripper is not calibrated, the values will display in percentage. |
|
|
Requested speed |
Shows the actual speed set of the Gripper.
|
|
|
Requested force |
Shows the actual force set of the Gripper:
|
|
|
Plus |
Tap to increase the corresponding parameter. |
|
|
Minus |
Tap to decrease the corresponding parameter. |
|
|
No object detected |
Icon shown when no object is detected during a grasp. |
|
|
Object detected |
The icon shows a green checkmark when an object is detected during a grasp. |
It is possible to toggle between a shown and a hidden Gripper Toolbar.
To add and edit a Gripper node inside your robot program, follow the steps below:
Info
The Gripper needs to be activated before it can receive a command. To do so, use the rq_activate_and_wait() function script at the beginning of the program or activate with the Gripper toolbar. Starting from Gripper URCap version 1.0.2, the Gripper activation script command (rq_activate() or rq_activate_and_wait()) must be preceded by the reset command (rq_reset()). This will force the Gripper's activation routine. Thus, if the Gripper was already activated, it will activate again.
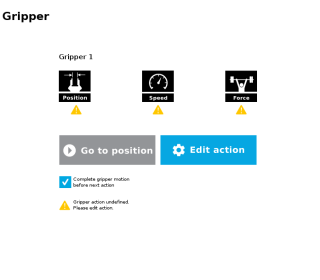
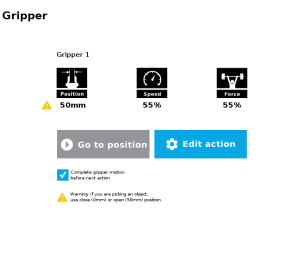
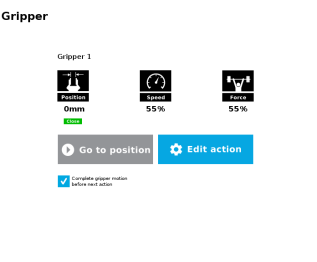
The Command window shows the requested action parameters for the Gripper node. Depending on the position, speed and force parameters, warning messages may display.
To edit the Gripper node, tap Edit action (please refer to the Edit action screen section for more details).
|
|
When the node is not defined, the Command window shows warning messages. Tap Edit action to modify the Gripper’s action. Caution Tap the Go to position button prior to editing the action. |
|
|
When the node requests the Gripper to close/open, the Command window warns that a partial opening/closing should not be performed for picking an object.
Info When the action is set for multiple Grippers, the header lists the selected Grippers (e.g. Grippers 1,2,3,4) |
|
|
When the Gripper action is set to close, a green "Close" icon appears. When the Gripper action is set to open, a green "Open" icon appears. |
|
Icon |
Functionality Name |
Description |
|---|---|---|
|
|
Requested position |
Shows the position requested for the current Gripper node. Read only. |
|
|
Requested speed |
Shows the speed requested for the selected Gripper node. Read only. |
|
|
Requested force |
Shows the force requested for the selected Gripper node. Read only. |
|
|
Go to position |
Sends all node parameters (position, force, speed) to the Gripper. Note: This button is disabled (grey) when the Gripper is already at the node position or when the Gripper is not powered/activated. |
|
|
Edit action |
Opens the Edit action screen, where you can edit the Gripper’s action parameters. |
|
|
Complete motion |
Selected by default. Selected: The Gripper completes its motion before executing the next action on the PolyScope program tree. This is slower but safer. |
|
|
Do not complete motion |
Selected by default. Unselected: As soon as the Gripper starts moving, PolyScope will execute the next action on the program tree. This allows you to move the Gripper and robot at the same time. |
|
|
Warning message section |
|
|
|
Gripper not activated |
“Warning, the Gripper is not powered or not activated. The Gripper will not move.” Make sure that the Gripper is installed correctly and powered. You need to activate it using the Gripper toolbar before running Gripper commands. |
|
|
Gripper action undefined |
“Gripper action undefined! Please edit action.” When creating a new node, all action parameters are undefined. Tap the edit action button to define parameters. |
|
|
Object picking warning |
“Warning, if you are picking an object, use close (100%) or open (0%) position.” It is highly recommended to only use 0% or 100% position when trying to pick an object. |
|
|
Node name |
Node name is automatically set to:
|
|
|
Open request |
When position requested is 0%, or the fully opened value defined in the Calibration wizard. |
|
|
Close request |
When position request is 100%. |
Tap Edit action from the Command window and use the Edit action screen to edit the Gripper’s parameters and adjust its position, speed and force. In normal usage conditions, the Gripper will move as soon as you change the position setting. The Gripper will not move if it is not properly powered, connected and activated.
Caution
The Gripper needs to be activated before it can receive a command. To do so, use the rq_activate_and_wait() function script at the beginning of the program or activate with the Gripper toolbar. Starting from Gripper URCap version 1.0.2, the gripper activation script command (rq_activate() or rq_activate_and_wait()) must be preceded by the reset command (rq_reset()). This will force the gripper's activation routine. Thus, if the gripper was already activated, it will activate again.
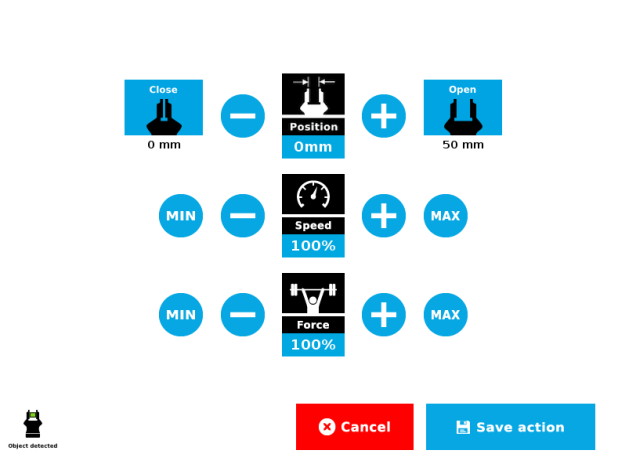
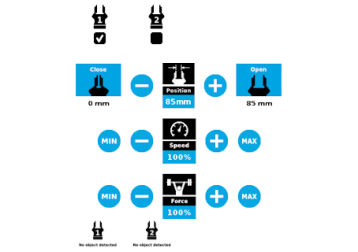
Fig. 4-12: Edit action screen
|
|
|
|
|
|
|
|
|
|
Primary Icon |
Functionality Name |
Description |
|---|---|---|
|
|
Open |
Tap to fully open the Gripper. Use this when you want to grip an object (internal grip), for example. |
|
|
Close |
Tap to fully close the Gripper. Use this when you want to grip an object (external grip), for example. |
|
|
Requested position |
Shows the position request for the selected Gripper node. |
|
|
Requested speed |
Shows the speed requested for the selected Gripper node. Use the Plus and Minus icons to modify. |
|
|
Requested force |
Shows the force requested for the selected Gripper node. Use the Plus and Minus icons to modify. |
|
|
Plus |
Tap to increase the corresponding parameter. |
|
|
Minus |
Tap to decrease the corresponding parameter. |
|
|
Cancel |
Cancels modifications and brings back the Gripper node command screen. |
|
|
Save action |
Saves settings into the selected Gripper node and brings back the Gripper node command screen. Note: This functionality is not available (grey) when the Gripper has the same action parameters as the selected Gripper node. |
|
|
No object detected |
Icon shown when no object is detected during a grasp. |
|
|
Object detected |
Icon shows a green checkmark when an object is detected during a grasp. |
Warning
If the Gripper is powered and activated, it will move as soon as a change to the parameter is made (position, speed, force).
Tip
Change speed and force when grasping fragile objects or other specific parts. In all other cases, it is recommended to use maximum speed and force.
In order to add and edit a Grip Check node:
TheGrip Check node is pre-packaged as an If statement that prompts the user to select between if the object is detected and if the object is not detected.
Selecting the former option allows the user to check a box and choose whether or not the grasp should be validated according to the object's dimension (in percentage if the Gripper is not calibrated, or in mm/in if the Gripper is calibrated—depending on the PolyScope configuration).
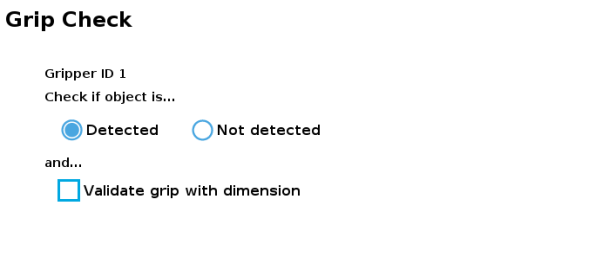
Fig. 4-13: Grip Check node interface
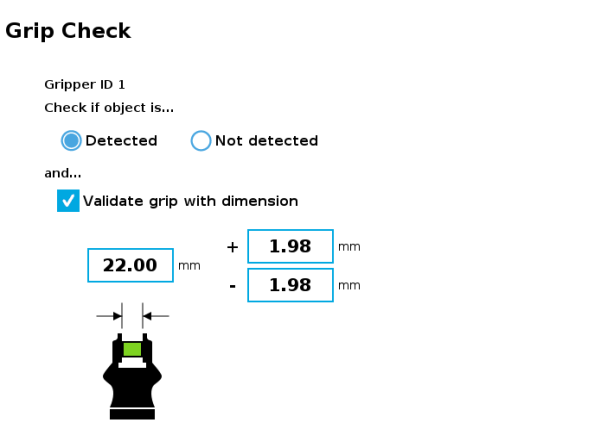
Fig. 4-14: Grip Check node interface with dimension validation
Given that the Grip Check node is an If statement, tapping the actual node in the Command tab brings up the option to add an Else instruction to the program tree.
In this window, the user can access information such as the Gripper's hardware, software and firmware versions, the number of cycles completed by the device and more.
If the Gripper version is obsolete, a warning message will display and an Upgrade firmware button will prompt the user to upgrade the firmware to the latest available version.
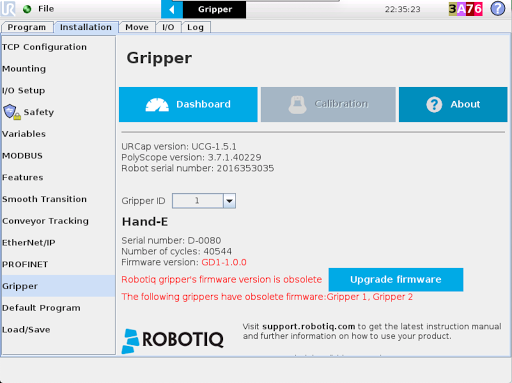
Fig. 4-15: Firmware Upgrade Warning Message in PolyScope for CB-Series
If a program is running without the Gripper being activated, the program will stop at the execution of a Gripper node and the following message will be displayed in a popup. Tap Stop Program and activate the gripper with the toolbar to continue or add an activation command in the program (please refer to the Advanced Gripper Functions section).

Caution
Starting from Gripper URCap version 1.0.2, the Gripper activation command (rq_activate() or rq_activate_and_wait()) must be preceded by the reset command (rq_reset()). This will force the gripper's activation routine. Thus, if the gripper was already activated, it will activate again.
With the URCap package installation, a program template will automatically be installed in the program folder of PolyScope. It contains comments and pop up windows that explain Gripper nodes and advanced functions.
Load and open the gripper_tutorial.urp program located in the root program folder. Make sure the Gripper is well connected to the UR controller. Run the program. You will see pop up windows with comments on the Gripper nodes and advanced functions.
Tip
Use the gripper_tutorial.urp to learn how to program the Gripper using nodes and advanced functions. You can copy the tutorial and start a new program based on it.
The use of Gripper URCap nodes allows to move the Gripper and modify its speed and force. However, some advanced functions are only available through UR Script commands.
Info
The Gripper needs to be activated before it can receive a command. To do so, use the rq_activate_and_wait() function script at the beginning of the program or activate with the Gripper toolbar.
The functions listed below can be called using subprograms in PolyScope or with a script. Functions with the suffix _and_wait will wait for the Gripper to complete its operation before going to the next step.
|
Name |
Description |
|---|---|
|
rq_activate() |
Sends the Gripper activation command. If it is already activated, nothing happens. Note that the Gripper must be activated to complete any other operation. Program execution continues before the end of activation. |
|
rq_activate_and_wait() |
Sends the Gripper activation command. If it is already activated, nothing happens. Note that the Gripper must be activated to complete any other operation. Program execution waits for the activation. |
|
rq_auto_release_close_and_wait() |
Slowly moves the Gripper to its maximum closed position. The Gripper must be activated after this command. Meant for emergency procedures. |
|
rq_auto_release_open_and_wait() |
Slowly moves the Gripper to its maximum opened position. The Gripper must be activated after this command. Meant for emergency procedures. |
|
rq_close() |
Moves the Gripper its fully closed position. |
|
rq_close_and_wait() |
Moves the Gripper to its fully closed position and waits until the motion is completed to execute the next command. |
|
rq_current_pos() |
Returns the current position of the fingers, from 0 to 255. Can be used to verify that the pick is successful, by comparing the finger position when the pick was taught with the similar-sized object. |
|
rq_current_pos_norm() |
Returns the current position of the fingers, normalized from 0% to 100%. Can be used to verify that the pick is successful, by comparing the finger position when the pick was taught with the similar-sized object. |
|
rq_current_pos_mm() |
Returns the current position of the fingers in millimeters, considering that the PolyScope configuration has been set to use the metric system as measurement system. Can be used to verify that the pick is successful, by comparing the finger position when the pick was taught with the similar-sized object. |
|
rq_current_pos_in() |
Returns the current position of the fingers in inches, considering that the PolyScope configuration has been set to use the imperial system as measurement system. Can be used to verify that the pick is successful, by comparing the finger position when the pick was taught with the similar-sized object. |
|
rq_get_gripper_max_cur(current_mA, gripperId) |
Returns the maximum supply current value of the appropriate Gripper in mA. |
|
rq_go_to() |
Sets the Go To bit to 1. |
|
rq_is_gripper_activated() |
Sets global variable rq_gripper_act to 1 if the Gripper is activated and returns True. Otherwise sets the variable to 0 and returns False. |
|
rq_is_motion_complete() |
Returns True if the motion of the Gripper is complete and False otherwise. Can be useful to synchronize a program after a Gripper node is run without the option “Complete Gripper motion before next action”. |
|
rq_is_object_detected() |
Returns True if the Gripper motion has stopped due to an object. Returns False if Gripper motion was not impeded by an object. Useful for verifying that an object has been picked correctly before going to the next step. Note: this function is not reliable for very small objects. Refer to the user manual for more details. |
|
rq_move_and_wait("position") |
Moves the Gripper to the position defined by the argument and waits until the motion is completed. |
|
rq_move("position") |
Moves the Gripper to the position defined by the argument. |
|
rq_move_and_wait_norm("position") |
Moves the Gripper to the position defined by the argument, normalized from 0% to 100%. Waits until the motion is completed. |
|
rq_move_mm() |
Moves the Gripper to the position defined by the argument. |
|
rq_move_and_wait_mm() |
Moves the Gripper to the position defined by the argument. |
|
rq_move_inches() |
Moves the Gripper to the position defined by the argument. |
|
rq_move_and_wait_inches() |
Moves the Gripper to the position defined by the argument. |
|
rq_move_norm("position") |
Moves the Gripper to the position defined by the argument, normalized from 0% to 100%. |
|
rq_open() |
Moves the Gripper to its fully opened position. |
|
rq_open_and_wait() |
Moves the Gripper to its fully opened position and waits until the motion is completed. |
|
rq_print_gripper_driver_state() |
Prints the driver's state to the UR log window. |
|
rq_print_gripper_driver_version() |
Prints the driver version to the UR log window. |
|
rq_print_gripper_fault_code() |
Prints the Gripper's fault code in the UR log window. |
|
rq_print_gripper_firmware_version() |
Prints the Gripper's firmware version to the UR log window. |
|
rq_print_gripper_num_cycles() |
Prints the Gripper's number of cycles in the UR log window. |
|
rq_print_gripper_serial number() |
Prints the Gripper's serial number in the UR log window. |
|
rq_reset() |
Resets the Gripper's activation status. Use after an autorelease before activating the Gripper. |
|
rq_set_force("force") |
Sets the Gripper's force defined by the argument, from 0 to 255. |
|
rq_set_force_norm("force") |
Sets the Gripper's force defined by the argument, normalized from 0% to 100%. |
|
rq_set_gripper_max_cur(current_mA, gripperId) |
Sets the Gripper's maximum supply current in mA |
|
rq_set_speed("speed") |
Sets the Gripper's speed defined by the argument, from 0 to 255. |
|
rq_set_speed_norm("speed") |
Sets the Gripper's speed defined by the argument, normalized from 0% to 100%. |
|
rq_stop() |
Stops the Gripper's motion. The Go To bit is set to 0. |
Here is an example of how to use the script commands with more than one gripper.
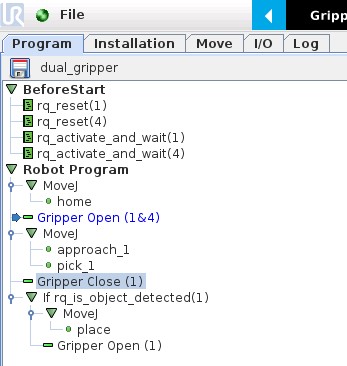
Fig. 4-16: Example of UR script commands with multiple Grippers
The functions listed below can be called using subprograms in PolyScope or with a script. Functions with the suffix _and_wait will wait for the Gripper to complete its operation before going to the next step.
|
Name |
Description |
|---|---|
|
rq_activate("gripper ID") |
Sends the Gripper activation command. If it is already activated, nothing happens. Note that the Gripper must be activated to complete any other operation. Program execution continues before the end of activation. |
|
rq_activate_and_wait("gripper ID") |
Sends the Gripper activation command. If it is already activated, nothing happens. Note that the Gripper must be activated to complete any other operation. Program execution waits for the activation. |
|
rq_auto_release_close_and_wait("gripperID") |
Slowly moves the Gripper to its maximum closed position. The Gripper must be activated after this command. Meant for emergency procedures. |
|
rq_auto_release_open_and_wait("gripperID") |
Slowly moves the Gripper to its maximum opened position. The Gripper must be activated after this command. Meant for emergency procedures. |
|
rq_close("gripper ID") |
Moves the Gripper its fully closed position. |
|
rq_close_and_wait("gripper ID") |
Moves the Gripper to its fully closed position and waits until the motion is completed to execute the next command. |
|
rq_current_pos("gripper ID") |
Returns the current position of the fingers, from 0 to 255. Can be used to verify that the pick is successful, by comparing the finger position when the pick was taught with the similar-sized object. |
|
rq_current_pos_norm("gripper ID") |
Returns the current position of the fingers, normalized from 0% to 100%. Can be used to verify that the pick is successful, by comparing the finger position when the pick was taught with the similar-sized object. |
|
rq_current_pos_mm("gripper ID") |
Returns the current position of the fingers in millimeters, considering that the PolyScope configuration has been set to use the metric system as measurement system. Can be used to verify that the pick is successful, by comparing the finger position when the pick was taught with the similar-sized object. |
|
rq_current_pos_in("gripper ID") |
Returns the current position of the fingers in inches, considering that the PolyScope configuration has been set to use the imperial system as measurement system. Can be used to verify that the pick is successful, by comparing the finger position when the pick was taught with the similar-sized object. |
|
rq_go_to("gripper ID") |
Sets the Go To bit to 1. |
|
rq_gripper_led_off() |
Forces the LEDs to OFF status. |
|
rq_gripper_led_on() |
Allows the firmware to turn ON the LEDs when they have been force to OFF status. |
|
rq_is_gripper_activated("gripper ID") |
Sets global variable rq_gripper_act to 1 if the Gripper is activated and returns True. Otherwise sets the variable to 0 and returns False. |
|
rq_is_motion_complete("gripper ID") |
Returns True if the motion of the Gripper is complete and False otherwise. Can be useful to synchronize a program after a Gripper node is run without the option “Complete Gripper motion before next action”. |
|
rq_is_object_detected("gripper ID") |
Returns True if the Gripper motion has stopped due to an object. Returns False if Gripper motion was not impeded by an object. Useful for verifying that an object has been picked correctly before going to the next step. Note: this function is not reliable for very small objects. Refer to the user manual for more details. |
|
rq_move_and_wait("position", "gripper ID") |
Moves the Gripper to the position defined by the argument and waits until the motion is completed. |
|
rq_move("position") |
Moves the Gripper to the position defined by the argument. |
|
rq_move_and_wait_norm("position") |
Moves the Gripper to the position defined by the argument, normalized from 0% to 100%. Waits until the motion is completed. |
|
rq_move_norm("position", "gripper ID") |
Moves the Gripper to the position defined by the argument, normalized from 0% to 100%. |
|
rq_open("gripper ID") |
Moves the Gripper to its fully opened position. |
|
rq_open_and_wait("gripper ID") |
Moves the Gripper to its fully opened position and waits until the motion is completed. |
|
rq_print_gripper_driver_state("gripper ID") |
Prints the driver's state to the UR log window. |
|
rq_print_gripper_driver_version("gripper ID") |
Prints the driver version to the UR log window. |
|
rq_print_gripper_fault_code("gripper ID") |
Prints the Gripper's fault code in the UR log window. |
|
rq_print_gripper_firmware_version("gripper ID") |
Prints the Gripper's firmware version to the UR log window. |
|
rq_print_gripper_num_cycles("gripper ID") |
Prints the Gripper's number of cycles in the UR log window. |
|
rq_reset("gripper ID") |
Resets the Gripper's activation status. Use after an autorelease before activating the Gripper. |
|
rq_set_force("force", "gripper ID") |
Sets the Gripper's force defined by the argument, from 0 to 255. |
|
rq_set_force_norm("force", "gripper ID") |
Sets the Gripper's force defined by the argument, normalized from 0% to 100%. |
|
rq_set_speed("speed", "gripper ID") |
Sets the Gripper's speed defined by the argument, from 0 to 255. |
|
rq_set_speed_norm("speed", "gripper ID") |
Sets the Gripper's speed defined by the argument, normalized from 0% to 100%. |
|
rq_stop("gripper ID") |
Stops the Gripper's motion. The Go To bit is set to 0. |
The Gripper URCap can be used within programs that were made with the legacy driver package. To do so, you need to do the following modifications:
Since they are probably not used in a production program, the fastest would be to suppress them, as shown in the figure below.
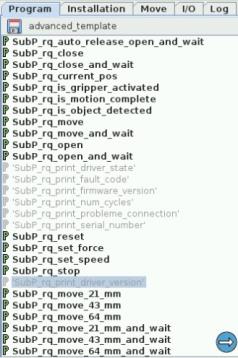
Fig. 4-17: Older program's subprograms to suppress or rename to use with URCaps package.
Here is the list of the functions that were renamed:
If your Universal Robots controller is not compatible with the URCap package (see Installation for Universal Robots section) for compatibility), you can install the driver package. This package allows programming of the Gripper with scripts in a PolyScope program. It includes program templates and examples to help you get started with your own custom program. It also contains the Gripper toolbar for jogging and controlling the Gripper.
The Gripper toolbar is automatically installed with the driver package. The Gripper toolbar allows you to jog and test the Gripper. It is a great tool to try grasps with the Gripper while programming.
|
Toolbar collapsed |
Toolbar expanded, Gripper activation window |
Toolbar expanded, Gripper operation window : |
|---|---|---|

|
|
|
|
Tap the Gripper button to expand the toolbar. |
|
Use the buttons of this window to jog and test the Gripper. |
|
Icon |
Functionality Name |
Description |
|---|---|---|
|
|
Gripper toolbar |
Tap to toggle between expand and collapse the Hand-E Gripper toolbar. When grey, the functionality is not available. |
|
|
Activate |
Tap to activate the Hand-E Gripper. The Gripper will fully open and close to set the zero of the position value.. |
|
|
Emergency open |
Slowly moves the Gripper to its fully closed position. |
|
|
Emergency close |
Slowly moves the Gripper to its fully open position. |
|
Icon |
Functionality Name |
Description |
|---|---|---|
|
|
Gripper toolbar |
Tap to toggle between expand and collapse the Hand-E Gripper toolbar. When grey, the functionality is not available. |
|
|
Open |
Tap to fully open the Gripper. |
|
|
Close |
Tap to fully close the Gripper. |
|
Position |
Requested position |
Shows the actual position of the Gripper:
|
|
Speed |
Requested speed |
Shows the actual speed set of the Gripper:
|
|
Force |
Requested force |
Shows the actual force set of the Gripper:
|
|
|
Increase force |
Tap to increase the force request. |
|
|
Decrease force |
Tap to decrease the force request. |
|
|
Increase speed |
Tap to increase the speed request.. |
|
|
Decrease speed |
Tap to decrease the speed request. |
|
|
No object detected |
Icon shown when no object is detected during a grasp. |
|
|
Object detected |
Icon shown when an object is detected during a grasp. |
When communication with the Gripper is not established, the expanded toolbar shows the driver version:
Fig. 4-18: Gripper toolbar expanded with driver version
Info
The driver state "RQ_STATE_INIT" means the driver is attempting to connect to a Robotiq Gripper. When connection is established, the normal toolbar detailed above will appear.
Tip
If you see the following toolbar with communication not established, check if your Gripper is powered first, then check if the RS-485 to USB converter is properly wired.
The following section details the demo scripts provided with the driver package.
pick_and_place_demo_with_subprograms.script is a demo script for pick and place applications using provided subprograms. The script uses subprograms included in the package such as rq_set_force, rq_set_speed, etc.
Info
All provided subprograms are identified with the prefix rq_.
The script uses rq_speed and rq_force as speed and force parameters to be used during the program. They can be modified using values from 0 to 255 (please refer to the Provided Variables and Functions section).
The script executes the following actions in sequence :
Info
Remember that all _and_wait subprograms will wait for the action to be completed before going to the next step.
Tip
Run with Universal Robots simulator first or make sure that the UR robot work area is totally cleared before running the script, as it will move the robot.
.pick_and_place_demo_async_partial_opening_without_subprograms.script is similar to the previous demo, but without using subprograms. This demo uses asynchronous commands so that the robot and the Gripper will move at the same time (the previous example had the Gripper and the robot move separately).
You can create your own program that commands the Gripper with the provided templates :
When programming an object pick up, use the rq_is_object_detected subprogram and rq_object_detect variable to know if an object has been picked. The subprogram sets the rq_object_detect variable to 1 if an object is detected, 0 otherwise.
Subprograms with the _and_wait will wait for the instruction to be completed before going to the next step. For example, rq_close_and_wait will wait for the motion to be completed before continuing to the next step, while rq_close will initiate motion and go to the next programmed step.
As shown in the figure below, the basic_template program will execute these instructions in a sequence:
Fig. 4-19: Basic template as shown in UR PolyScope.
When using the advanced_template, you have access to all of the subprograms listed in the Provided Variables and Functions section. Unused subprograms can be removed from the list. You must use global variables to pass information, not arguments.
The file rq_script.script contains function definitions and variables that enhance the programming of the Gripper. Here is the list of these variables and functions.
Variables are used when programming the Gripper using subprograms. Since it is not possible to pass arguments to subprograms, the global variables listed below must be used.
|
Name |
Range |
Description |
|---|---|---|
|
rq_force() |
[0-255] |
Force set point. Change this variable by calling the subprogram SubP_rq_set_force. |
|
rq_gripper_act() |
[0-1] |
1 if the Gripper is activated. This variable is updated by calling either SubP_rq_is_gripper_activated or SubP_rq_activate_and_wait. |
|
rq_move_complete() |
[0-1] |
1 if the motion is complete. This variable is updated by calling one of the following:
|
|
rq_object_detect() |
[0-1] |
1 if an object is detected. This variable is updated by calling one of the following:
|
|
rq_pos() |
[0-255] |
Position set point. This variable is updated by calling SubP_rq_current_pos. |
|
rq_speed() |
[0-255] |
Speed set point. Change this variable by calling the subprogram SubP_rq_set_speed. |
|
Name |
Description |
|---|---|
|
rq_activate() |
Sends the Gripper activation command. If it is already activated, nothing happens. Note that the Gripper must be activated to complete any other operation. Program execution continues before the end of activation. |
|
rq_activate_and_wait() |
Sends the Gripper activation command. If it is already activated, nothing happens. Note that the Gripper must be activated to complete any other operation. Program execution waits for the activation. |
|
rq_auto_release_close_and_wait() |
Slowly moves the Gripper to its maximum closed position. The Gripper must be activated after this command. Meant for emergency procedures. |
|
rq_auto_release_open_and_wait() |
Slowly moves the Gripper to its maximum opened position. The Gripper must be activated after this command. Meant for emergency procedures. |
|
rq_close() |
Moves the Gripper its fully closed position. |
|
rq_close_and_wait() |
Moves the Gripper to its fully closed position and waits until the motion is completed to execute the next command. |
|
rq_current_pos() |
Sets global variable rq_pos to the current Gripper position and returns this value. |
|
rq_is_gripper_activated() |
Sets global variable rq_gripper_act to 1 if the Gripper is activated and returns True. Otherwise sets the variable to 0 and returns False. |
|
rq_is_motion_complete() |
Sets global variable rq_mov_complete to 1 if the Gripper motion is complete and returns True. Otherwise sets the variable to 0 and returns False. |
|
rq_is_object_detected() |
Sets global variable rq_obj_detect to 1 if the Gripper has detected an object and returns True. Otherwise, sets the variable to 0 and returns False. |
|
rq_move_and_wait() |
Moves the Gripper to the position defined by the argument and waits until the motion is completed. |
|
rq_move() |
Moves the Gripper to the position defined by the argument. |
|
rq_open() |
Moves the Gripper to its fully opened position. |
|
rq_open_and_wait() |
Moves the Gripper to its fully opened position and waits until the motion is completed. |
|
rq_set_force() |
Writes the value of rq_force into the force setting. |
|
rq_set_speed() |
Writes the value of rq_speed into the speed setting. |