The following subsections will guide you through the installation and general setup of your Robotiq Wrist Camera Vision System:
Warning
Before installing :
Warning
When installing :
RWC-UR-KIT
Standard upon delivery:
Caution
The hardware for fixing a tool on the Wrist Camera is not provided.
Combo of 2-Finger Adaptive Gripper and Wrist Camera for Universal Robots:
CUR-AGC-085-RWC or CUR-AGC-140-RWC
Standard upon delivery:
The following tools are required to install the Wrist Camera:
Provided tools with the Wrist Camera:
Optional tools if installing 2-Finger combo: CUR-AGC-085-RWC or CUR-AGC-140-RWC:
The following parts are required for setup:
The Camera needs to be supplied by a DC voltage source. This power supply is not included with the Camera kit for UR. Required power supply must match the Robotiq device. The following table shows the specifications with regards to the power supply required to operate the Camera and the optional Robotiq Gripper.
|
SPECIFICATION |
VALUE |
|---|---|
|
Output voltage |
24 V DC ±10% |
|
Output current |
1 A |
|
Overcurrent |
Recommended power supply with internal protection, otherwise fusing is required. |
Table 3 - 1: Robotiq Wrist Camera and 2-Finger power supply requirements.
Info
1Suggested fuse is a: Phoenix Contact # 0916605 2 A thermal; use AWG #20 wiring.
Warning
If your power supply exceeds the specified regulation, over-voltage protection is required.
Robotiq recommends the use of the following power supplies:
The Wrist Camera is designed for industrial applications. Always respect the following specified operating environmental conditions:
|
CONDITION |
VALUE |
|---|---|
|
Minimum storage/transit temperature |
-30°C [-22°F] |
|
Maximum storage/transit temperature |
70°C [158°F] |
|
Minimum operating temperature |
0°C [32°F] |
|
Maximum operating temperature |
50°C [122°F] |
|
Humidity (non-condensing) |
Non-condensing. |
|
Others |
Lenses must be free from dust, soot and water. Environment must be free from powerful electromagnetic interference. Environment must be free from corrosive or explosive liquids or gases. |
Table 3 - 2: Environmental and operating conditions for the Wrist Camera.
Wrist Camera kit for Universal Robots
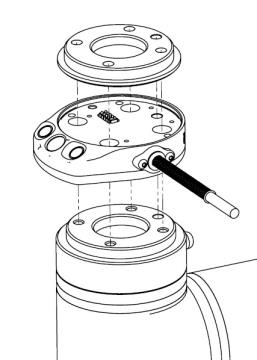
For mechanical installation of a Wrist Camera on a UR robot along with an end-effector (other than Robotiq's 2-Finger Gripper), follow these instructions and refer to the figure below:
Fig. 3-1: Mechanical installation of the Wrist Camera kit for Universal Robots.
The end-effector is not screwed in the camera or the tool plate, but directly in the robot arm. Both camera and tool plate have through holes for this assembly.
Warning
Make sure the Camera is oriented properly.
Do not offset the Camera from the tool center point on the X and Y axes, or around the Z axis.
Hardware
M6 screws to mount an end-effector on the Wrist Camera are not provided. Use M6 screws of appropriate length to secure the end-effector on the robot arm.
For mechanical installation of a Wrist Camera on a UR robot along with Robotiq's 2-Finger Gripper, follow these instructions, and refer to the figure below:
When mounting only the Wrist Camera on the robot, the spring pins that would ensure connection to a Robotiq 2-Finger Gripper are exposed. Be careful not to harm them.
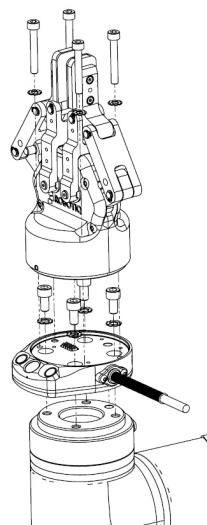
Fig. 3-2: Mechanical installation of the Combo of 2-Finger Gripper and Wrist Camera for Universal Robots.
The Wrist Camera interfaces with an end-effector (such as a Robotiq 2-Finger Gripper) via a 10-spring pin connector located on its outer surface.

Caution
If mounting a 2-Finger Gripper on the Wrist Camera, the Camera replaces the gripper's coupling. Therefore, only the Wrist Camera's device cable is required to provide power and communication to both the camera and the gripper. The wiring for setups including only the camera or both the camera and the gripper is the same.
Power and communication are established with the Wrist Camera via the high-flex device cable. The cable provides a 24V power supply to the Wrist Camera and enables USB 2.0 communication with the Universal Robots controller.
Follow these steps to correctly wire the Wrist Camera (or the camera and 2-Finger Gripper combo) to a Universal Robots controller :
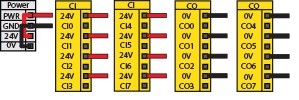
Fig. 3-3: Power supply wiring on CB3.1 Universal Robots controller.
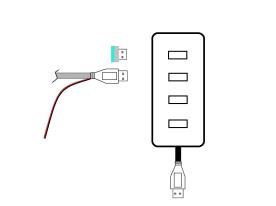
Fig. 3-4: 4-port USB hub connection.
Wrist Camera grounding is optional and is done via the robot ground. The camera's indexing pin (dowel) is the ground connector.
Warning
Use proper cabling management. Be sure to have enough forgiveness in the cabling to allow movement of the Gripper along all axes without pulling out the connectors. Always protect the controller side of the cable connection with a strain relief cable clamp.
Make sure the Wrist Camera is properly mounted on the robot arm and that all electrical wiring is correctly done (refer to the Mechanical Installation section and the Electrical Setup section). Make sure your Universal Robots software is up to date. PolyScope must be version 3.3 or later in order to install a URCap.
Do not unplug the 16 Gb USB stick or the USB license dongle, even after the installation has been completed.
Center of mass
Prior to use over Universal Robots, adjust the center of mass and payload from the Installation tab (refer to the Mechanical Specifications of Wrist Camera section).
Make sure the Wrist Camera is properly mounted to the robot arm and that all electrical wiring is correctly done (refer to the Mechanical Installation section and the Electrical Setup section). Make sure your Universal Robots software is up to date. The URCap pertaining to this product version has been tested in PolyScope 3.5.
Update
For the URCap update, refer to the Update and Uninstall section.

Fig. 3-5: Files at the root of the 16 Gb USB stick.
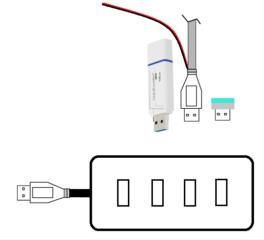
Fig. 3-6: Connections on the 4-port USB hub.
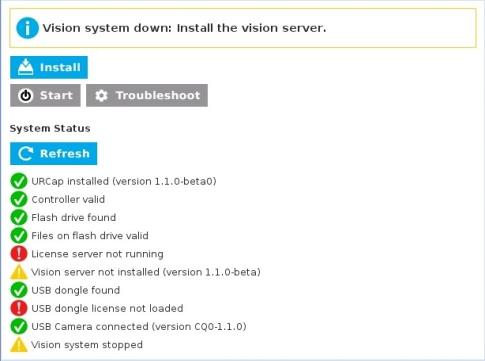
Fig. 3-7: Camera dashboard ready to install the vision server.
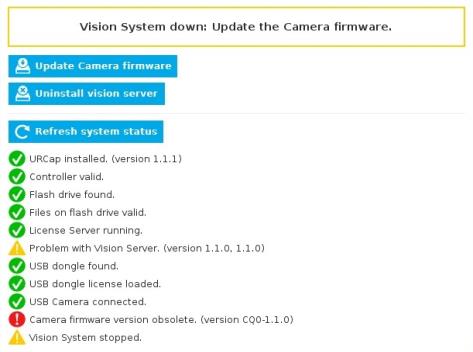
Fig. 3-8: Camera dashboard with camera firmware upgrade.
Do not unplug the 16 Gb USB stick or the USB license dongle, even after the installation has been completed.
Dashboard
The Dashboard tab contains helpful information for troubleshooting the vision system.
After the installation has been completed, verify that the vision system works properly.
PolyScope 5.0+
Center of Mass
Prior to use over Universal Robots, adjust the center of mass and payload from the Installation tab (refer to the Mechanical Specifications of Wrist Camera section).
Warning
Updating the Wrist Camera software, unplugging the USB storage device and/or switching USB ports must always be done while the robot is initialized and running.